Difference between revisions of "Category:Nano-coating"
(Tag: Visual edit) |
(Tag: Visual edit) |
||
| Line 88: | Line 88: | ||
A well working method for the Nano-coating is to make the Nano-coating with a stain steel pot and a heater. Escpecially when you don't have a warm environment around 25-35 degrees, which are optimal temperatures for a proper Nano-coating, this method is very usefull. | A well working method for the Nano-coating is to make the Nano-coating with a stain steel pot and a heater. Escpecially when you don't have a warm environment around 25-35 degrees, which are optimal temperatures for a proper Nano-coating, this method is very usefull. | ||
| + | |||
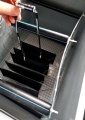
| + | === Nano-Coating with a stain steel pot and heater === | ||
| + | [[File:Nano-coating with stain steel pot description.jpg|thumb|500x500px|Nano-coating with stain steel pot description]] | ||
| + | This possibility comes from a Knowledge Seeker which achieves very good results with it. It's also very suitable in cold places, because a temperature of 25-35 degrees is very advantageous for a good Nano-Coating. The Caustic can also be reused, which is not possible with a plastic box. With this process you can control the temperature with a heater. It is important that the pot is made of stainless steel, as this material does not interact with the Caustic und that the pot closes well to prevent escaping steams. Also it seams that it is important, that the pot(/container) is round. So the steams have a better flow through it. | ||
| + | |||
| + | Here you should develop your own approach, as each heater and pot has different characteristics. For example, one heater or pot takes longer to heat and the other takes less. One is smaller, one is bigger and so on... | ||
| + | |||
| + | First of all, the plates should hang fully covered in the Caustic for 2-3 days (Phase 1: Caustic bath). Then remove so much Caustic that the plates are exposed. A remaining amount, which is then heated, remains in the pot. | ||
| + | |||
| + | In general it is a matter of heating up the Caustic to such an extent that vapours are produced in the pot, which the plates Nano coats. Once the caustic has been heated, leave it for a few hours at a low temperature and then use a multimeter or battery to draw off the current. Then you heat the caustic again and repeat this process. The more often you do this, the better the Nano-coating will be. | ||
| + | |||
| + | As you see on the picture beside, this is a possible construct and solution, how you can hang in the plates. | ||
| + | |||
| + | '''Additional:''' | ||
| + | |||
| + | It has been tested from this Knowledge Seeker, that if the plates are previously coated by the fire method, the Nano-coating process goes faster, because the molecules get opened up through the fire-coating. | ||
| + | |||
| + | '''Wear your safety equipment and make sure that the pot closes well and that you do not inhale the fumes!''' | ||
=== Polishing the Nano-Coating === | === Polishing the Nano-Coating === | ||
Revision as of 11:51, 16 January 2019
The philosophy of the Keshe Foundation is, plasma should be available for free to humanity. This is why all steps of production are open source and available at no cost to the public. Step by step instructions on how to produce different types of GANSes are available on this WIKI. The Foundation manufactures products. If you would like to purchase one of our many products, please go to the Keshe Foundations Webshop: https://store.keshefoundation.org/store/
Contents
Nano-Coating

The base material for the coating is Copper in any form. The coating is carried out either chemically by etching (steam coating with NaOH) or thermally by heating (Fire Coating by gas burner). During the coating process "gaps between the [outer most layers of Copper] atoms" are created. The coating is often referred to as Nano-coating, the layers of which build up during the process of the creation of the coating. The following video explains Nano-layers in details:
Nano-Coating using NaOH
In order to coat Copper wires or plates, you will need:
- A plastic container with lid (not too big)
- Weights for weighing down the lid
- Ready-wound Copper coil, wires or plates
- ~ 100 grams of pure NaOH powder or beads (Do not use drain cleaners. You can buy it in art shops; it is used to remove paint as alkaline-based stripper, or in chemist's/drugstore)
- ~ 2 liters of distilled water (according to the quantity of coils and size of the plastic container)
- Electric kettle or stove top to boil water
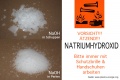
Sodium hydroxide in small beads or flakes (cost: approximately 10 euros / kg)
Distilled water

Plastic container with lid and weight.

"Raw" copper coils.


Phase 1: Caustic bath (~ 2 days)
- A Zinc grid (can be a mesh, which is Zinc coated) is placed at the bottom of the plastic container.
- Scatter just enough NaOH powder to cover the entire bottom of the container.
- Before placing the plates in the container, you can drill a small hole at the top corners of the plate(s).
- Hang the coils and/or plates directly in the container, so that they do not touch each other and the container
- Place the lid, slightly askew, on the container. Leave a small opening.
- Boil distilled water and pour it (boiling) into the container via the opening until water covers all the coils and/or the plates.
- Quickly close the opening by placing the lid correctly on the container.
- If necessary, place a weight on the lid to ensure as little steam as possible escapes.
- Leave the container in this state for 24 hours, place the container on a warm location (ideal over 25°C, best at about 30°C)
IMPORTANT: The entire Nano-material needs to be covered completely in the Caustic bath!
Caution: During the pouring of boiling water, steam will escapes. Please wear protective glasses and protective gloves during this process.
Phase 2: Growing of Nano-Layers (~ 2-4 days)
- After 24 hours have passed, remove most of the water of the container and leave about 5mm liquid at the bottom of the plastic container
- Let stand for another 2 till 4 days on a warm place or directly in the sun. (30-35 degrees are optimal)
- Every 6 hours, take a multimeter (set on mv) and touch with the negative pole one end of the plate and with the positive pole at several positions to drain the plate(s) voltage.
- For coils, if its a double coil, touch the coil with the negative pole of a multimeter at the positive pole of the coil and touch the positive pole of the multimeter at the negative pole of the coil for a few seconds, to drain the voltage out of the coil(s).
- When this process is completed, never touch the Nano-coating and ensure the coils and/or plates never touch each other.
Caution: Use protective glasses and protective gloves during this process.
Phase 3: Wash the Nano-material
- Wash the plates and coils several times, using hand-warm water
- Let them dry again slowly (do not heat and pile the material, hang it again), coils and plates should never touch each other
Additional Information
The more often you repeat the process (Phase 2 and 3), the stronger the Nano-coating becomes.
Mr Keshe said, that we can use only NaOH, or NaOH and KOH for the Nano-Coating, what will make two different CO2 GANSes, because the Nano-Coating still contains the fields of NaOH and KOH, after washing the plates. It depends on the purpose of the GANS, if KOH should be contained too. Basically we use only NaOH
Nano-Coating Using A Gas Burner

With this type of coating process it is not necessary to go through the process of polarization (draining the voltage) and drying. However, temperature and direction of application of the fire coating is crucial. When applying the fire coat, the direction in which you apply the flame to the copper must always be in the direction of flow of the coiled wires and the wires must never reach a point of glowing due to the application of heat. Once the wires are heated to a point where they begin to emit a golden shimmer, the gas burner should be moved to an adjacent point on the wires. (For clarification, this will be explained in detail below in an accompanying video).
Moreover, the coils will begin to cool as soon as you move the flame from an area that is being heated to an adjacent point. If, after a few seconds of the heat being removed from an area, the wires take on different colors like red, turquoise or blue throughout the area, this is an indication that the temperature during the fire coating of that area was too low. If this occurs, simply return the flame to the area and coat it again before moving to an adjacent area. If however the wire begins to glow, the temperature is too high and you should back the burner away from the coils slightly to decrease the temperature and continue coating. With practice, the application process becomes automatic.
To fire coat, you require:
- A gas burner with butane gas (it also works with a propane / butane mixture)
- Copper coils or plates
- Refractory mounting device for mounting/hanging the coils or plates (preferably metallic)
Important: Do not apply the fire coat in rooms that are too cold. Doing so will cause the coating layer to easily separate from the Copper wire. There are also differences in quality of the Copper wires. Sometimes slight cracks at the surface of the raw uncoated wire can be detected.
Note: Please use a gas burner with a tight and narrow pointed flame when applying the coating to ensure very accurate pinpoint application at an area on the wire. If you use a wide, broad flame you will heat up too wide of an area of wire at once. This will result in inaccuracy in the direction of heating of each coil. (Please view the following video for clarification).
https://www.youtube.com/watch?v=gRaeT-7zIJs Fire Coating Video
When Nano-coating Copper using fire, it is done at least in two or more sessions depending on how consistent you become in each session. Between each session, the Copper is allowed to cool at room temperature. During the cooling process the Copper continues to interact with the atmosphere and you will begin to see a change in color on the surface of the Copper. The reaction of the Nano-coated Copper during the succeeding sessions will be different compared to the first session when fire is first applied. On each succeeding session, the Nano layer on the surface of the Copper also acts as another layer of conductor and a heat sink. When the flame is applied, this surface layer will start to change into a dull color Copper before reaching that right temperature of "shimmering surface" look. We still look for that "golden shimmering" moment as in the previous session and move the flame to the adjacent area. A third or more sessions is only required when you see inconsistency of Nano-coating colours due to uneven lower heat application or flaking Nano layers due to excessive heat application.
Important: For a MaGrav set of coils or multiple coils formation, the color of the inner coil (gravitational) and the color of the outer coil (magnetical) will usually manifest differently from each other due to the field interaction of the Nano layers as they are created during the Nano-coating process. Different materials (different batch of Copper) will also have a different Nano-coating layer. The environmental conditions (flame temperature, atmospheric air quality and temperature, plasma fields) during the Nano-coating process greatly influence how the nano materials will manifest on the surface of the material like Copper.
Additional opportunities
Nano-coating with heater and stain steel pot
A well working method for the Nano-coating is to make the Nano-coating with a stain steel pot and a heater. Escpecially when you don't have a warm environment around 25-35 degrees, which are optimal temperatures for a proper Nano-coating, this method is very usefull.
Nano-Coating with a stain steel pot and heater

This possibility comes from a Knowledge Seeker which achieves very good results with it. It's also very suitable in cold places, because a temperature of 25-35 degrees is very advantageous for a good Nano-Coating. The Caustic can also be reused, which is not possible with a plastic box. With this process you can control the temperature with a heater. It is important that the pot is made of stainless steel, as this material does not interact with the Caustic und that the pot closes well to prevent escaping steams. Also it seams that it is important, that the pot(/container) is round. So the steams have a better flow through it.
Here you should develop your own approach, as each heater and pot has different characteristics. For example, one heater or pot takes longer to heat and the other takes less. One is smaller, one is bigger and so on...
First of all, the plates should hang fully covered in the Caustic for 2-3 days (Phase 1: Caustic bath). Then remove so much Caustic that the plates are exposed. A remaining amount, which is then heated, remains in the pot.
In general it is a matter of heating up the Caustic to such an extent that vapours are produced in the pot, which the plates Nano coats. Once the caustic has been heated, leave it for a few hours at a low temperature and then use a multimeter or battery to draw off the current. Then you heat the caustic again and repeat this process. The more often you do this, the better the Nano-coating will be.
As you see on the picture beside, this is a possible construct and solution, how you can hang in the plates.
Additional:
It has been tested from this Knowledge Seeker, that if the plates are previously coated by the fire method, the Nano-coating process goes faster, because the molecules get opened up through the fire-coating.
Wear your safety equipment and make sure that the pot closes well and that you do not inhale the fumes!
Polishing the Nano-Coating
A opportunity for making the Nano-coating much stronger is to polish it during a lot of repetitions of the Nano-coating.
For polishing a Nano-coating you use a very fine cloth, what you use for example to clean glasses. It’s finer than an 8.000 cent paper. You polish it in circles and then you Nano-coat it again. The top surface breaks through it and you more or less seal it and then you grow on this sealed surface new Nano-layers. From Nano-coating to Nano-coating the layers get stronger and stronger. If the Nano-coating is made several times, you can produce much more GANS with one piece.
Nano-Coating with GANSes or other materials
When we use for the Caustic/Nano-coating process already Plasmafied water, for example CO2 GANS-water, the fields of the CO2 will be in the Nano-coating. If you already know what you want to do with it, you can do that. For example if you want to make a Pain Pen and use CO2/ZnO, you can use already the GANS of CO2 and ZnO and the GANS-water for the Caustic process. So the fields are inside and influence the effect positive. If you want to make clean CuO GANS with it, it isn't a good idea to use CO2/ZnO. Then you use CuO. If you want to make a Nano-coating with herbs, you can do it.
Coating of plastic balls
In contrast to glass balls the plastic balls hold the fields rather inside.Tests showed, that Nano-coated plastic balls are much more efficient. The most common way to coat plastic balls is, just adding it to Caustic. The Caustic has to touch the inside and the outside, to coat both surfaces.
Direct the Nano-Layer flow with a battery
For giving the Nano-coating the flow a direction, you can use a standard 1.5V battery, if you do not have a multimeter or if you want to be save, because sometimes multimeters go "crazy" and don't work right.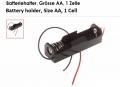
Battery 1.5V holder
Battery 1.5V for directing the Nano-Layer flow.jpg


Prepare Nano-coated material for GANS-production
Before you go into the production of GANS you have to wash the Nano-coated material, otherwise you add the Caustic plates or coils immediately into your containers of GANS production. As long as you do not need your plates, leave them in your container, you can store them there, without washing. As soon as you wash your plates or coils, you stop the growth of Nano-layers.
Pages in category "Nano-coating"
The following 2 pages are in this category, out of 2 total.