|
|
| (67 intermediate revisions by 2 users not shown) |
| Line 1: |
Line 1: |
| − | '''<big>Second Cup of Life - Production and Application - Prevention and reversal of the Corona Virus - Not by killing, through depleting it from its energy, as higher field strength gives to the lower field strength - That is the Universal Law: The more you give the more you receive</big>'''
| + | == Introduction == |
| | | | |
| − | The '''First One Cup One''' '''Life''' works on the white tissues of the lungs and brain.
| + | Infinity Loops absorb and protect from different fields, like radiations and other influencing environmental factors (5G, chemtrails, computer, mobile phone, pulsed high frequency radiation and so on). |
| | | | |
| − | The '''Second Cup of Life''' will work on the red tissues of the stomach and down the body.
| + | == Production of the bare Infinity Loops == |
| | | | |
| − | Therefore we have to make a new Second Cup of Life. You carry on applying the First One Cup One Life application.
| + | === Required Equipment === |
| | + | <u>First the Copper wire is prepared and the Infinity Loops are formed. For this process you need:</u> |
| | | | |
| − | Application of the Second Cup of Life is to produce the field strength to stand at the same level as the mutation of the Corona Virus in the red tissues.
| + | * stranded Copper wire |
| | + | * cutting pliers, or scissors |
| | + | * knife |
| | + | <gallery widths="200" heights="200" mode="nolines"> |
| | + | File:Infinity Loop 1g.jpg| |
| | + | </gallery> |
| | | | |
| − | Therefore the production of the Second Cup of Life is the application that starts from under the breast. It will cover the heart tissues and the diaphragm down to the whole intestines and the legs. Under no circumstances DO NOT apply to the lungs and DO NOT apply on the head.
| |
| | | | |
| − | == Production of the second Cup of Life == | + | === Preparation of the Copper stranded wire === |
| | | | |
| | + | Stranded wire is characterized by the fact that many small strands together form a wire. (See photo). You can find it in the hardware store, at an electrical store, or in an emergency, at home, in the power cables of your hair dryer, radio, television, coffee machine, etc. To do this, simply '''unplug''' the power cable from the outlet. Cut the entire electrical cord off of the appliance to use the whole cord. |
| | | | |
| − | === Required equipment ===
| + | Depending on the desired size of the Infinity Loops, select the length of the Copper wire. 20 cm of Copper wire results in a 6-8 cm long Infinity Loop, which can be attached to a mobile phone. If you want to position them on the Computer, Television, around the house, or on windows, they can also be larger. But it is not necessary to fill for example the whole window in the size. A length of 8, 10, 15 cm is completely sufficient. |
| − | In this picture you can see all the equipment and already prepared materials you need for the assembly of the Second Cup of Life and the production of the GANS and the Plasma Water. In the following you will find all materials, pictures and the necessary steps described in detail.
| |
| − | | |
| − | | |
| − | [[File:2nd OneCup OneLife Nr. 2 - Prepared equipment with Copper.jpg|left|frameless|350x350px]]
| |
| − | [[File:2nd OneCup OneLife - Preparing the Copper wire 1.jpg|thumb|200x200px|In case you have no Copper plate you can replace the bare Copper plate with flat, accordion shaped bare Copper wire.]]
| |
| − | Gas burner, fire and tong(s)
| |
| − | | |
| − | Three connecting wires
| |
| − | | |
| − | Copper plate, Nano-coated Copper coil and bare Copper coil
| |
| − | | |
| − | Tape and old battery (less energy left)
| |
| | | | |
| − | Empty glass, tap water, table salt* and scale
| + | If you want to make many Ininity Loops at once, you may need a long Copper wire. From this you can remove all the plastic and then cut it into the desired lengths. How to remove the plastic from the wire, is explained in the following steps. |
| − | | |
| − | <div style="clear:both;">
| |
| − | | |
| − | | |
| − | <nowiki>*</nowiki>If the label lists the presents of iodine in the salt, replace it with the white sea salt that doesn’t contain iodine. E 535 (Sodium Ferrocyanide) and E 536 (Potassium Ferrocyanide) are ok, or even beneficial.
| |
| − | </div>
| |
| − | | |
| − | '''In case of emergency you can use salt that contains iodine.'''
| |
| − | | |
| − | | |
| − | | |
| − | === Production of the bare Copper coil ===
| |
| − | For the Second Cup of Life, two coils are made from stranded Copper wire. One that is used as a bare wire and one that is used for the Nano-coating application. Approx. 30 cm (11.8 inches) of wire is needed per coil.
| |
| − | | |
| − | | |
| − | ==== Preparation of the Copper stranded wire ====
| |
| − | Stranded wire is characterized by the fact that many small strands together form a wire. (See photo). You can find it in the hardware store, at an electrical store, or in an emergency, at home, in the power cables of your hair dryer, radio, television, coffee machine, etc. To do this, simply '''unplug''' the power cable from the outlet. Cut the entire electrical cord off of the appliance to use the whole cord.
| |
| | | | |
| | <gallery mode="nolines" widths="200" heights="200"> | | <gallery mode="nolines" widths="200" heights="200"> |
| Line 54: |
Line 31: |
| | | | |
| | ====Removing the plastic from the wire==== | | ====Removing the plastic from the wire==== |
| − | Usually there are two or three wires in a electrical cable. The plastic outer sheath must first be removed. There are several ways to do this. (If you buy stranded wires separately, this step is not necessary) | + | Usually there are two or three wires in a power cable. The plastic outer sheath must first be removed. There are several ways to do this. (If you buy stranded wires separately, this step is not necessary) |
| | | | |
| | | | |
| Line 65: |
Line 42: |
| | File:OneCup OneLife - Cutting and Stripping off the wire 5.jpg| | | File:OneCup OneLife - Cutting and Stripping off the wire 5.jpg| |
| | </gallery> | | </gallery> |
| − |
| |
| | | | |
| | =====Variant 2===== | | =====Variant 2===== |
| Line 77: |
Line 53: |
| | File:OneCup OneLife - Cutting the plastic around the wires with a knife 5.jpg| | | File:OneCup OneLife - Cutting the plastic around the wires with a knife 5.jpg| |
| | </gallery> | | </gallery> |
| − |
| |
| | | | |
| | ====Stripping off the plastic around the strands==== | | ====Stripping off the plastic around the strands==== |
| Line 86: |
Line 61: |
| | File:OneCup OneLife - Stripping of plastic around the strands 4.jpg| | | File:OneCup OneLife - Stripping of plastic around the strands 4.jpg| |
| | </gallery> | | </gallery> |
| − |
| |
| | | | |
| | ====Twisting together the individual strands of the wire==== | | ====Twisting together the individual strands of the wire==== |
| Line 97: |
Line 71: |
| | </gallery> | | </gallery> |
| | | | |
| | + | === Creating the Infinity Loop === |
| | + | Now the Infinity Loop gets formed. |
| | | | |
| − | ====Winding of the coil====
| + | The wire is formed into a circle with the two ends crossing each other and extending 1-2 cm beyond the circle. |
| − | To wind the coil, take a pencil, or something else round and hold it together with the end of the wire in one hand. With the other hand you wrap the wire completely around the pencil. Now tighten both ends of the wire again so that it fits tightly and push the windings together. The coil is ready and can be taken off the pencil.<gallery mode="nolines" widths="200" heights="200">
| |
| − | File:OneCup OneLife - Winding of the coil 1.jpg|
| |
| − | File:OneCup OneLife - Winding of the coil 2.jpg|
| |
| − | File:OneCup OneLife - Winding of the coil 3.jpg|
| |
| − | File:OneCup OneLife - Winding of the coil 4.jpg|
| |
| − | File:OneCup OneLife - Winding of the coil 5.jpg|
| |
| − | </gallery>
| |
| − | | |
| − | | |
| − | | |
| − | ===Creating the Nano-coated coil===
| |
| | | | |
| − | ====Nano-coating of the wire for the second coil====
| + | Twist the ends with the circle. |
| − | Before the wire is wound for the second coil, it must be Nano-coated. This requires a gas burner. You turn on the gas and ignite carefully. Hold one end of the wire with pliers. With your other hand you carefully hold the other end of the wire. Starting with the side held by the pliers, you hold the wire in the fire until it glows red. So be careful the end of the wire can become hot. Move steadily down the wire to the other end. Each section of the wire as it passes through the fire glows red, cools down and turns black. This black material is the Nano-coating. Before it gets too hot at the other end of the hand, you stop and put the wire on something solid and let it cool down. Each section of the wire has to get black. To do this, you can repeat the process from one side to the other. Remember the wire must glow red even at the ends. Allow the wire to cool down, then proceed to the next step.
| |
| | | | |
| − | Please never cut a Nano-coated wire!<gallery mode="nolines" widths="200" heights="200">
| + | Take the circle in both hands between your fingers and turn one side 180 degrees to form an eight. <gallery widths="200" heights="200" mode="nolines"> |
| − | File:OneCup OneLife - Nano-coating with fire 1.jpg| | + | File:Infinity Loop 1.jpg| |
| − | File:OneCup OneLife - Nano-coating with fire 2.jpg| | + | File:Infinity Loop 2.jpg| |
| − | File:OneCup OneLife - Nano-coating with fire 3.jpg| | + | File:Infinity Loop 3.jpg| |
| − | File:OneCup OneLife - Nano-coating with fire 4.jpg| | + | File:Infinity Loop 4.jpg| |
| − | File:OneCup OneLife - Nano-coating with fire 5.jpg|
| + | </gallery>Take one or more single strands and wrap the middle part so that it fits tight. |
| − | File:OneCup OneLife - Nano-coating with fire 6.jpg|
| |
| − | File:OneCup OneLife - Nano-coating with fire 7.jpg|
| |
| − | </gallery> | |
| | | | |
| | + | Wrap one strand around the area where you have connected the Infinity Loop wire. This strand will later be used to hang the Infinity Loops for the nano-coating process. |
| | | | |
| − | ==== Winding of the Nano-coated coil ====
| + | (It is important that the area where you have connected the Infinity Loop wire is on top, as it will be easier to reach it later with the poles of the multimeter).<gallery widths="200" heights="200" mode="nolines"> |
| − | The Nano-coated coil is wound on a pencil like the bare Copper coil.<gallery mode="nolines" widths="200" heights="200">
| + | File:Infinity Loop 5.jpg| |
| − | File:OneCup OneLife - Winding the Nano-coated coil (2).jpg| | + | File:Infinity Loop 6.jpg| |
| − | File:OneCup OneLife - Winding the Nano-coated coil.jpg| | + | File:Infinity Loop 8.jpg| |
| | + | File:Infinity Loop 9.jpg| |
| | </gallery> | | </gallery> |
| | | | |
| | + | == Nano-coating Process with NaOH == |
| | | | |
| | + | === Required Equipment === |
| | | | |
| − | === Preparing the Copper plate ===
| + | <u>When the Infinity Loops are formed, they become nano-coated. For this process you need:</u> |
| − | You can get Copper in the hardware store, a plumbing shop, or at your home as electric wires.
| |
| − | | |
| − | When the Copper plate is ready, it is bent at the top to hang it on the edge of the glass later. | |
| − | | |
| − | (In case you don't have a Copper plate you can also use a Copper wire and fold it like an accordion. Not like a coil.)
| |
| − | | |
| − | <gallery mode="nolines" widths="200" heights="200">
| |
| − | File:2nd OneCup OneLife - Preparing the Copper plate 2.jpg|
| |
| − | File:2nd OneCup OneLife - Preparing the Copper plate 1.jpg|
| |
| − | File:2nd OneCup OneLife - Preparing the Copper wire 1.jpg|
| |
| − | </gallery> | |
| − | | |
| | | | |
| − | === Preparing three connection wires ===
| + | * Ready-made Copper Infinity Loops |
| − | For connecting the Copper plate (the Copper wire accordion), the bare Copper coil and the Nano-coated Copper coil with a used battery, 3 connection wires are needed. For these connections stranded wires or a single solid pure Copper wire can be used. Cut the wires in 30 cm pieces. Strip off the plastic 2-5 cm on each end of each wire. (You will need one end of one wire to be stripped a little longer to connect the wider area of the Copper plate. See visualisation in following pictures in "Connecting the Copper plate". For the accordion 2-5 cm are are ok.)<gallery mode="nolines" widths="200" heights="200">
| + | * A plastic container with lid (not too big) |
| − | File:OneCup OneLife - Preparing the connecting wires 1.jpg| | + | * (Weight to weigh down the lid if it cannot close tightly itself.) |
| − | File:OneCup OneLife - Preparing the connecting wires 2.jpg| | + | * ~ 50 grams of pure NaOH flakes or beads on 1 liter distilled water. (Do not use drain cleaners. You can buy it in art shops; it is used to remove paint as alkaline-based stripper, or in chemist's/drugstore) |
| | + | * Distilled water (according to the quantity of Infinity Loops and size of the plastic container) (e.g. 3 l water and ~150 grams of NaOH) |
| | + | * Chicken mesh (Grid out of Iron which is coated with Zinc) |
| | + | * Electric kettle or stove top to boil water |
| | + | * Multimeter (or battery with wires) |
| | + | * Safety equipment [Gloves, safety goggles, breathing protection (cloth, mask), skin protection (face covering, long clothing)] |
| | + | <gallery widths="200" heights="200" mode="nolines"> |
| | + | File:Infinity Loop 10d.jpg|Plastic box with lid and weight, chicken mesh and NaOH flackes |
| | + | File:Infinity Loop 10f.jpg|Electric kettle and distilled water |
| | + | File:Infinity Loop 10a.jpg|Multimeter or battery |
| | + | File:Infinity Loop 1f.jpg|Gloves, safty goggles, cloth |
| | </gallery> | | </gallery> |
| | | | |
| | + | === Preparing the plastic box for the Nano-coating process === |
| | + | This example is one way you can make your nano-coating box. |
| | | | |
| | + | Here two holes were made with a glowing Copper wire, pressed against the plastic at the areas, where the holes should be. After that, two solid Copper wires got twisted together, to be able to carry the weight of the later hung up Infinity Loops. Both ends are put through the two holes in the inside. The Copper wire goes around the plastic box and is fixed with hot glue. Also the holes in the plastic box were sealed with hot glue. |
| | | | |
| − | ===Connecting the bare Copper coil and Copper plate===
| + | <gallery widths="200" heights="200" mode="nolines"> |
| − | ==== Connecting the bare Copper coil ====
| + | File:Infinity Loop 10.jpg| |
| − | To connect the bare Copper coil to the connecting wire, simply twist the ends of the wires together.<gallery mode="nolines" widths="200" heights="200">
| + | File:Infinity Loop 11.jpg| |
| − | File:OneCup OneLife - Connecting the blank Copper coil 1.jpg| | + | File:Infinity Loop 12.jpg| |
| − | File:OneCup OneLife - Connecting the blank Copper coil 2.jpg| | |
| − | File:OneCup OneLife - Connecting the blank Copper coil.jpg| | |
| | </gallery> | | </gallery> |
| | | | |
| − | | + | ===Measuring how much water (and NaOH) is needed === |
| − | | + | Before you go to the next step, you have to determine how much water is needed. To do this, you can hang an Infinity Loop inside and fill the box with water until the whole Infinity Loop is under water. The water must not be higher than the holes in the plastic box that were made to put the suspension wires through. Otherwise the later caustic solution can eat through the hot glue and run out. The hot glue only serves to prevent the fumes from escaping later. Now you can empty your water in a measuring cup and you know exactly, how much water you need. (You just add a little bit more water, because through the later boiling of the water, a part of it vaporize and is and is otherwise missing.)<gallery widths="200" heights="200" mode="nolines"> |
| − | ===Connecting the Copper plate=== | + | File:Infinity Loop 141a.jpg| |
| − | To connect the Copper plate, (or accordion) with the connecting wire, use the longer stripped part of the connecting wire. Wrap it around the Copper plate as shown in the pictures and twist the Copper wire firmly together.<gallery mode="nolines" widths="200" heights="200"> | |
| − | File:2nd OneCup OneLife - Connecting the Copper plate with connection wire 1.jpg| | |
| − | File:2nd OneCup OneLife - Connecting the Copper plate with connection wire 2.jpg|
| |
| − | File:2nd OneCup OneLife - Connecting the Copper plate with connection wire 3.jpg|
| |
| − | File:2nd OneCup OneLife - Preparing the Copper wire 1.jpg|
| |
| | </gallery> | | </gallery> |
| | | | |
| | + | ===Phase 1: Hot Caustic Bath (2 to 3 days) === |
| | + | {| class="floatright" background:#F9F9F9; " |
| | + | | <youtube width="400" height="220">https://www.youtube.com/watch?v=U7YG-vMm_q8&feature=youtu.be</youtube> |
| | + | |} |
| | + | '''<big>Now, before you go any further, you'll put on your safety gear! NaOH is an extremely corrosive material and any eye, skin contact or inhalation of the vapours should be avoided completely. Put on gloves, goggles, respiratory protection (mask, towel, ...) and also long clothes to cover and protect the skin completely.</big>''' |
| | | | |
| − | ==== Connecting the two connecting wires together ====
| + | Now you know how much water you need and also you can calculate with it, how much NaOH you need. For 1 liter distilled water you need approximately 50 grams of NaOH. (So for example 750 milliliter you need approximately 37,5 grams of NaOH). Empty the NaOH in your cup. |
| − | Twist the two connecting wires from the Copper coil and Copper plate, at the opposite end together.
| |
| | | | |
| − | (In case you work with the accordion Copper, twist this end with the connecting cable together.)
| + | Cut the chicken mesh so that it fits into the box. Bend the sides so that it is 1 to 2 cm above the bottom, when you put it in the box. (The Infinity Loops must not touch the chicken wire later). |
| | | | |
| − | <gallery mode="nolines" widths="200" heights="200"> | + | <gallery widths="200" heights="200" mode="nolines"> |
| − | File:2nd OneCup One Life - Twisting the connection wires together.jpg| | + | File:Infinity Loop 13.jpg| |
| − | File:2nd OneCup OneLife - Preparing the Copper wire 1.jpg| | + | File:Infinity Loop 14.jpg| |
| − | </gallery> | + | File:Infinity Loop 15.jpg| |
| | + | </gallery>The Infinity Loops are hung up and fixed in the box. They should not touch each other and should also be fixed in such a way that they cannot really turn or move. |
| | | | |
| | + | <gallery widths="200" heights="200" mode="nolines"> |
| | + | File:Infinity Loop 16.jpg| |
| | + | File:Infinity Loop 17.jpg| |
| | + | File:Infinity Loop 20.jpg| |
| | + | </gallery>'''<big>For the next step you should be on the fresh air, because hot caustic steam will rise up. Also wear your whole safety equipment! Cover your whole skin! Be careful!</big>''' |
| | | | |
| | + | Take an old cleaning shreds, or towel and place it on the ground. (If the hot caustic solution gets on a surface, like grass or every other ground it will cauterize and leave its tracks.) |
| | | | |
| − | === Creating the Copper bridge and connecting the Nano-coated Copper coil ===
| + | Place the box on it and ensure, that the lid (and weight) is handy to close the box. (In this example no weight is used to weigh down the lid, because the lid itself closes very well and strong alone) |
| − | A Copper bridge is required to suspend the Nano-coated Copper coil in the middle of the glass. To do this, you bend a single strand of Copper wire into a bridge, so that it fits on the glass as shown in the picture. Next, attach by winding tightly the end of the Nano-coated Copper coil to the middle of the bridge. One end of the third stripped wire is attached by winding to one of the sides of the bridge.<gallery mode="nolines" widths="200" heights="200">
| |
| − | File:OneCup OneLife - Connecting the Nano-coated Copper coil 1.jpg|
| |
| − | File:OneCup OneLife - Connecting the Nano-coated Copper coil 2.jpg|
| |
| − | File:OneCup OneLife - Connecting the Nano-coated Copper coil 3.jpg|
| |
| − | File:OneCup OneLife - Connecting the Nano-coated Copper coil 4.jpg|
| |
| − | File:OneCup OneLife - Connecting the Nano-coated Copper coil 5.jpg|
| |
| − | </gallery>
| |
| | | | |
| | + | Boil the water in a kettle or cooking pot. When the water boils, pour it into the box. Don't lean over the box and keep your distance as much as possible. The hot, pungent fumes are coming up. The water and NaOH in the box will also boil and splash out. Don't pour too much and too quickly at once, otherwise there will be small "explosions" and a lot of spurting out. It should also not take too long, because the first 5-10 seconds are very important for opening up the Copper atoms and a well nano-coating. Once the Infinity Loops are covered, close the lid. |
| | | | |
| − |
| + | <u>In case you get splashes of the caustic solution in your eyes or on your skin, water should be available. You wash your eyes or your skin with it. If CO2 plasma water is available, it can also be used.</u> |
| − | The Nano-coated Copper coil wound around the bridge is placed in the middle of the glass. The bare Copper coil and the Copper plate (or the accordion Copper) are attached to the opposite edge of the glass, facing each other and facing inwards. The connecting wires all face one direction to be connected to the battery.
| |
| | | | |
| − | The Copper plate, the Nano-coated Copper coil and the Copper coil, are not allowed to touch each other while in production!<gallery mode="nolines" widths="200" heights="200">
| + | Ideally you should then leave the box in a warm place (30-40 degrees) and wait at least 2-3 days before proceeding with the next step. <gallery widths="200" heights="200" mode="nolines"> |
| − | File:2nd OneCup OneCup - Placing the coils and Copper on the cup 1.jpg| | + | File:Infinity Loop 21.jpg| |
| − | File:2nd OneCup OneCup - Placing the coils and Copper on the cup 2.jpg| | + | File:Infinity Loop 23.jpg| |
| − | File:2nd OneCup OneCup - Placing the coils and Copper on the cup 3.jpg| | + | File:Infinity Loop 24.jpg| |
| − | File:2nd Cup of Life Setup with accordion.jpg|Example with Copper accordion | + | File:Infinity Loop 25.jpg| |
| | </gallery> | | </gallery> |
| | | | |
| | + | ===Phase 2: Growing of the Nano-Layers (min. 2 days) === |
| | + | It can be, but it don't has to be, that a few Infinity Loops turned already to a darker, black colour. The next step is, to empty the caustic solution into a plastic bottle and save it for another reuse ([[Testpage general#Reuse of the caustic solution|Reuse of the caustic solution]]). Let around 5 mm of the caustic solution at the bottom of the box, close the lid and give the box to a worm place for minimum of two days. (30-40 degrees are optimal. So it is steaming, it has a little moisture and new nano-layers can build up. The longer this process goes on, the more layers can build up and the stronger the coating is.) |
| | | | |
| | + | <gallery widths="200" heights="200" mode="nolines"> |
| | + | File:Infinity Loop 27.jpg| |
| | + | File:Infinity Loop 29.jpg| |
| | + | File:Infinity Loop 32.jpg| |
| | + | </gallery>Take every 6 hours a multimeter (set on mv) and touch with the negative pole one end of the Infinity Loop wire and with the positive pole the other end of the wire to align the nano-layers. (The values on the multimeter are jumping). In case you have no multimeter, you can also use a battery. You connect the plus pole with one Copper wire and the minus pole with one Copper wire. With this two wires you can do the same process. The Infinity Loops become blacker and blacker. |
| | | | |
| − | === Connecting the battery to the connection wires ===
| + | <gallery widths="200" heights="200" mode="nolines"> |
| − | The battery must be almost empty, so it must contain very little energy.
| + | File:Infinity Loop 40a.jpg| |
| − | | + | File:Infinity Loop 33.jpg| |
| − | Together the two twisted connecting wires of the Copper plate (or accordion Copper) and the bare Copper coil are attached to the positive (+) pole of the battery with adhesive tape. The connecting wire from the Nano-coated coil is connected to the negative (-) pole of the battery. (The end of the battery with the knob is the positive pole and the flat end of the battery is the negative pole.)
| + | File:Infinity Loop 361a.jpg| |
| − | | |
| − | Connect the connecting wires tightly and firmly to the poles of the battery.
| |
| − | | |
| − | Please elevate your battery above your cup (example picture below).<gallery mode="nolines" widths="200" heights="200">
| |
| − | File:2nd OneCup OneLife - Connecting the Battery 1.jpg| | |
| − | File:OneCup OneLife - Connecting the battery 2.jpg|
| |
| − | File:OneCup OneLife - Connecting the battery 3.jpg|
| |
| − | File:OneCup OneLife - Connecting the battery 4.jpg|
| |
| − | File:2nd OneCup OneLife - Connecting the Battery 2.jpg| | |
| − | File:2nd OneCup OneLife - Placing the Battery above the water level 2.jpg| | |
| | </gallery> | | </gallery> |
| | | | |
| − | ===Create a 15% salt water mixture by using 150 grams salt per 1 liter of clean water === | + | ==== Using a battery instead of the multimeter ==== |
| − | Create a 15% salt water mixture and empty it in the cup. The Copper coils and the Copper plate (or accordion) should only be a little bit out of the water.
| + | In case you don't have a multimeter, you can also use a 1,5 Volt battery. Just take 2 Copper wires and strip the plastic at their ends of. You connect one wire on the battery plus pole and one wire on the battery minus pole. Use a adhesive tape to attach the end of both wires in the middle of the poles tightly. You can use it like the multimeter.<gallery mode="nolines" widths="200" heights="200"> |
| − | | + | File:Infinity Loop 10b.jpg| |
| − | Make sure your connection wires don't touch the water.
| + | File:Infinity Loop 10c.jpg| |
| − | | |
| − | <gallery mode="nolines" widths="200" heights="200"> | |
| − | File:OneCup OneLife - Creating the 15% salt water solution 4.jpg| | |
| − | File:OneCup OneLife - Creating the 15% salt water solution 5.jpg | | |
| − | File:2nd OneCup OneLife- Filling the saltsolution in 1.jpg|
| |
| | </gallery> | | </gallery> |
| | | | |
| − | ==Production of the materials (Amino Acids and GANS) == | + | === Phase 3: Washing of the Nano-material === |
| | + | Now you can empty the rest of the caustic solution out of the box and put up the lid in a way, that a little air comes all the time into the box. So the Nano-coating can dry slowly. Till the Infinity Loops are dry, it can also take a few days, depending on the caustic leftovers in the box and how much air comes into the box. You can also continue using the multimeter (or battery). When the Infinity Loops are totally dry, they will have white caustic leftovers on it. Even it is only a small veil, or in any case, you have to wash them. Simply pour warm water over the Infinity Loops, pour the whole water out again and repeat the process a few times. Then place the box open in a warm place, where the Infinity Loops can dry quickly. |
| | | | |
| − | === You will see soon bubbles rising to the surface ===
| + | <gallery widths="200" heights="200" mode="nolines"> |
| − | That is the starting process of your Second Cup of Life that will form simultaneously your Amino Acids which is the fatty looking layer floating on the surface of the water and also the GANS at the bottom of your cup will be created. (From left to right: Nano-coated wire with bubbles, Amino Acids, GANS)<gallery mode="nolines" widths="200" heights="200">
| + | File:Infinity Loop 41.jpg| |
| − | File:OneCup OneLife - Nano-coated coil Bubbles.jpg| | + | File:Infinity Loop 43.jpg| |
| − | File:OneCup OneLife - Production 1.jpg| | + | File:Infinity Loop 42.jpg| |
| − | File:OneCup OneLife - Production 2.png| | |
| | </gallery> | | </gallery> |
| − |
| |
| − | [[Category:OneCup OneLife - Anti Virus Cup of Life]]
| |
| | | | |
| | + | == Using the Infinity Loops == |
| | + | To hang or attach the Infinity Loops somewhere, you can use e.g. a thread and/or adhesive tape. You can place them around your house, in rooms and everywhere you wish to absorb not wanted fields and to be protected. |
| | | | |
| − | | + | <gallery widths="200" heights="200" mode="nolines"> |
| − | == Preparing the materials for the first harvest of Amino Acids, GANS and Plasma Water ==
| + | File:Infinity Loop 44.jpg|window |
| − | | + | File:Infinity Loop 45.jpg|ceiling of the room |
| − | | + | File:Infinity Loop 46.jpg|computer |
| − | [[File:OneCup OneLife - Materials needed to extract the GANS 2.jpg|right|frameless|262x262px]]
| |
| − | === Materials needed to extract the GANS from the One Cup One Life ===
| |
| − | [[File:OneCup OneLife - Materials needed to extract the GANS (2).jpg|left|frameless|400x400px]]
| |
| − | Syringe, plastic spoon, a set of 3 glass jars and reserve bottles; straw, tape, plant spray bottle or small spray bottle.
| |
| − | | |
| − | | |
| − | Avoid using any metals in and around your GANSes, Amino Acids and Plasma Water. Don’t use metal spoons and remove metal lids from your glass jars or any metal in any shape or form.
| |
| − | | |
| − | | |
| − | Before you start, join the syringe and straw with a tape.
| |
| − | | |
| − | <div style="clear:both;"></div>
| |
| − | | |
| − | | |
| − | ===First application, how to remove first the Amino Acids from Second Cup of Life before removing the GANS ===
| |
| − | ==== Method ====
| |
| − | With a plastic spoon, gently remove the Amino Acids that are floating on the top. These are a fatty looking layers floating on the surface of your Second Cup of Life. Place these Amino Acids in your <u>1st glass jar</u> to keep for further application.
| |
| − | | |
| − | <gallery mode="nolines" widths="200" heights="200"> | |
| − | File:OneCup OneLife - Production 1.jpg| | |
| − | File:OneCup OneLife - How to remove first the Amino Acids from the One Cup One Life before removing the GANS 2.jpg| | |
| − | File:OneCup OneLife - How to remove first the Amino Acids from the One Cup One Life before removing the GANS 3.jpg|
| |
| − | File:OneCup OneLife - How to remove first the Amino Acids from the One Cup One Life before removing the GANS 4.jpg|Second Cup of Life and 1st glass jar | |
| | </gallery> | | </gallery> |
| | | | |
| − | <div style="clear:both;"></div>
| + | == Additional Information == |
| − | | |
| − | | |
| − | | |
| − | === Removing the GANS from the Second Cup of Life ===
| |
| − | | |
| − | ==== First application ====
| |
| − | Apply the straw to the syringe by taping. Use the syringe to extract the GANS at the bottom of your Second Cup of Life.
| |
| − | | |
| − | The extracted GANS taken up by the syringe, and present in the syringe, is put in your <u>2nd glass jar</u>.
| |
| − | | |
| − | ==== Or second application ====
| |
| − | In case you have no syringe you gently empty your Second Cup of Life completely in the <u>2nd glass jar</u> and wait until your GANS settles completely at the bottom and the top layer is clean water. Now you pour only the clean salty water back into your Second Cup of Life and leaving the GANS behind. Now add extra salt water to your Second Cup of Life to reach the original level, so that it continues producing GANS.
| |
| − | | |
| − | <div style="clear:both;"></div><gallery widths="200" heights="200" mode="nolines">
| |
| − | File:Removing the GANS from the One Cup One Life 1.jpg|
| |
| − | File:Removing the GANS from the One Cup One Life 1a.jpg|Second Cup of Life and 2nd glass jar
| |
| − | File:Removing the GANS from the One Cup One Life 3.jpg|
| |
| − | File:Removing the GANS from the One Cup One Life 2a.jpg|
| |
| − | File:Removing the GANS from the One Cup One Life 4a.jpg|
| |
| − | </gallery>
| |
| − | | |
| − | === Washing of your GANS ===
| |
| − | ==== 1st washing of your GANS ====
| |
| − | Add clean water to your <u>2nd glass jar</u> where the GANS you just extracted is present. Let the GANS settle to the bottom of the <u>2nd jar</u> until you have clear Plasma Water above the GANS. <gallery mode="nolines" widths="200" heights="200">
| |
| − | File:OneCup OneLife - Washing the GANS 0.jpg|2nd glass jar
| |
| − | File:OneCup OneLife - Washing the GANS 00.jpg|
| |
| − | File:OneCup OneLife - Washing the GANS 000.jpg|
| |
| − | </gallery>
| |
| − | | |
| − | | |
| − | You can save this salty water into an extra reserve bottle.<gallery mode="nolines" widths="200" heights="200">
| |
| − | File:OneCup OneLife - Washing the GANS 2a.jpg|
| |
| − | File:OneCup OneLife - Washing the GANS 7a.jpg|
| |
| − | </gallery>
| |
| − | | |
| − | | |
| − | | |
| − | ==== 2nd washing of your GANS ====
| |
| − | Add clean water to your <u>2nd glass jar</u> where the GANS you just extracted is present. Let the GANS settle to the bottom of the <u>2nd jar</u> until you have clear Plasma Water above the GANS.
| |
| − | | |
| − | <gallery mode="nolines" widths="200" heights="200">
| |
| − | File:OneCup OneLife - Washing the GANS 0.jpg|2nd glass jar
| |
| − | File:OneCup OneLife - Washing the GANS 00.jpg|
| |
| − | File:OneCup OneLife - Washing the GANS 000.jpg|
| |
| − | </gallery>
| |
| − | | |
| − | | |
| − | You can save this salty water into an extra reserve bottle.<gallery mode="nolines" widths="200" heights="200">
| |
| − | File:OneCup OneLife - Washing the GANS 2a.jpg|
| |
| − | File:OneCup OneLife - Washing the GANS 7a.jpg|
| |
| − | </gallery>
| |
| − | | |
| − | | |
| − | | |
| − | ==== 3rd washing of your GANS ====
| |
| − | Add clean water to your <u>2nd glass jar</u> where the GANS you just extracted is present. Let the GANS settle to the bottom of the <u>2nd jar</u> until you have clear Plasma Water above the GANS. <gallery mode="nolines" widths="200" heights="200">
| |
| − | File:OneCup OneLife - Washing the GANS 0.jpg|2nd glass jar
| |
| − | File:OneCup OneLife - Washing the GANS 00.jpg|
| |
| − | File:OneCup OneLife - Washing the GANS 000.jpg|
| |
| − | </gallery>
| |
| − | | |
| − | | |
| − | You can save this salty water into an extra reserve bottle.<gallery mode="nolines" widths="200" heights="200">
| |
| − | File:OneCup OneLife - Washing the GANS 2a.jpg|
| |
| − | File:OneCup OneLife - Washing the GANS 7a.jpg|
| |
| − | </gallery>
| |
| − | | |
| − | | |
| − | | |
| − | ==== 4th or 5th washing of your GANS in case there is any salt residual left in your Plasma Water ====
| |
| − | Add clean water to your <u>2nd glass jar</u> where the GANS you just extracted is present. Let the GANS settle to the bottom of the <u>2nd jar</u> until you have clear Plasma Water above the GANS. <gallery mode="nolines" widths="200" heights="200">
| |
| − | File:OneCup OneLife - Washing the GANS 0.jpg|2nd glass jar
| |
| − | File:OneCup OneLife - Washing the GANS 00.jpg|
| |
| − | File:OneCup OneLife - Washing the GANS 000.jpg|
| |
| − | </gallery>
| |
| − | | |
| − | | |
| − | | |
| − | === Making the Plasma Water of the Second Cup of Life ready to be applied ===
| |
| − | Repeat this process of washing until all the salt is removed from your <u>2nd jar</u>.
| |
| − | | |
| − | '''Test:''' Dip your finger in the water after every wash and if the water tastes not salty anymore the process is finished.
| |
| − | | |
| − | Now you can add a spoon of your saved Amino Acids to your Plasma Water containing the GANS. Steer it with non-metallic spoon (plastic), or glas rod, or shake it closed with a lid out of plastic. You shake it and you let the GANS settle down until you have only clean Plasma Water on the top.
| |
| − | | |
| − | ==== Important ====
| |
| − | Also add a spoon from your saved Amino Acids from your One Cup One Life to this ready made Plasma Water from your Second Cup of Life.
| |
| − | | |
| − | This ready made Plasma Water is applied from the breast down to the toes, back and front of the body, applied or by spraying or washing. Do not go above the breast areas front and back. STAY BELOW THE BREAST! VERY IMPORTANT!
| |
| − | | |
| − | '''Do not drink or breathe this GANS from the Second Cup of Life!'''
| |
| − | | |
| − | <gallery mode="nolines" widths="200" heights="200">
| |
| − | File:OneCup OneLife - Adding Amino Acids to the Plasma water.jpg|2nd glass jar
| |
| − | File:OneCup OneLife - Adding Amino Acids to the Plasma water (2).jpg|
| |
| − | </gallery>
| |
| − | | |
| − | | |
| − | This Plasma Water is ready to be applied.
| |
| − | | |
| − | This gives your Plasma Water the extra field strength through the adding of the field strength of the Amino Acids explained by Mr Keshe.
| |
| − | | |
| − | The field strength of the GANS is continuously transferred to the water.
| |
| − | | |
| − | | |
| − | '''Advice:''' Always keep a readymade 15% salt water solution of 1 liter of clean water with 150 grams of normal table salt. The salt is completely dissolved in cold water and you can top up with this solution your Second Cup of Life or multiple cups.
| |
| − | | |
| − |
| |
| − | | |
| − | === '''<big>HOW TO APPLY IN A SAFE MANNER YOUR PLASMA WATER AND GANSES FROM YOUR SECOND CUP OF LIFE</big>''' ===
| |
| − | | |
| − | <gallery mode="nolines" widths="200" heights="200">
| |
| − | File:OneCup OneLife - Storing of GANSes 4.png|
| |
| − | File:OneCup OneLife - Storing of GANSes 2.png|
| |
| − | </gallery>
| |
| − | | |
| − | The GANS needs to be always at the bottom of your bottle or any other container as visible in these images.
| |
| − | | |
| − | | |
| − | '''<big>You only take the clean water above the GANS!</big> '''
| |
| − | | |
| − | That is your Plasma Water from your Second Cup of Life <u>2nd jar</u>.
| |
| − | | |
| − | <big>'''Never use any of your GANSes from any of your Second Cup of Life'''</big>
| |
| − | | |
| − | '''<u>Do not eat, drink or touch GANS !</u>'''
| |
| − | | |
| − | The field strength is too high to consume as explained by Mr Keshe in the teachings.
| |
| − | | |
| − | | |
| − | | |
| − | ===Different ways of storing of the Plasma Waters, GANSes, Amino Acids ===
| |
| − | Keep them in glass or plastic jars and always keep away from any metals.<gallery mode="nolines" widths="200" heights="200">
| |
| − | File:OneCup OneLife - Storing of GANSes 1.png|
| |
| − | File:OneCup OneLife - Storing of GANSes 3.png|
| |
| − | File:OneCup OneLife - Storing of GANSes 4.png|
| |
| − | File:OneCup OneLife - Storing of GANSes 2.png|
| |
| − | </gallery>
| |
| − | | |
| − | | |
| − | | |
| − | == Standard application of the Second Cup of Life Plasma Water ==
| |
| − | | |
| − | === Only spray and wash from under the breast down to the toes ===
| |
| − | <gallery mode="nolines" widths="200" heights="200">
| |
| − | File:OneCup OneLife - Utilities 1.png|Spray bottle
| |
| − | File:OneCup OneLife - Utilities 4.png|Pocket spray bottle
| |
| − | </gallery>
| |
| − | | |
| − | | |
| − | === Preventive Plasma Water application of the Second Cup of Life ===
| |
| − | The '''Second Cup of Life''' will protect you against the virus that has mutated and has start attacking the red tissues of the body.
| |
| − | | |
| − | Therefore, we apply the Plasma Water of the Second Cup of Life in the following order.
| |
| − | | |
| − | The application of the Plasma Water of the Second Cup of Life is to produce the field strength to stand at the same level as the new mutations of the Corona Virus at this given moment in the red tissues.*
| |
| − | | |
| − | '''The´application of the Second Cup of Life:'''
| |
| − | | |
| − | Start to spray the body or wash the body at the point from underneath the breast.
| |
| − | | |
| − | <u>Start this process of applying the Plasma Water first in the morning, repeat lunch time and repeat evening</u>
| |
| − | | |
| − | Spray your shoes and try to use the same shoes to go in and out of the house. Spray your shoes inside and outside. Pay special attention to spray your trousers with Plasma Water of your Second Cup of Life before you go outside the house and before you come inside the house.
| |
| − | | |
| − | Spray your door handles and your hands.
| |
| − | | |
| − | | |
| − | ===Additionally ===
| |
| − | Involve every family member in this process. [[File:Pigs-title.jpg|thumb|[[Keshe Foundation Plasma Technology Resolves the African Swine Fever Problem in China]]]]
| |
| − | | |
| − | All of the Second Cups of Life that are in production should not be placed next to each other. Leave a minimum of 1 meter between your cups, or place them in other rooms. You have to create sufficient enough space between the cups that your production stays optimal and stops the interference of the field strengths. In this way you create correct GANSes in your cups.
| |
| − | | |
| − | | |
| − | === Application for prevention and in case of infection ===
| |
| − | Also apply to the caretakers and caring family members.
| |
| − | | |
| − | If you have responded with a high temperature after you have applied the Plasma Water of the Second Cup of Life by spraying below the breast down to the toes, use the following procedure:
| |
| − | * Immediately take 50 ml Plasma Water from your First One Cup One Life that is still in production and add this salty Plasma Water to your 0.5 Liter Second Cup of Life Plasma Water.
| |
| − | * You drink 50 ml of this Plasma Water of your Second Cup of Life every 30 min for 6 hours non stop. Do not stop the application of the drinking of the Plasma Water of the Second Cup of Life. This Plasma Water of the Second Cup of Life will act like an antibiotic and can persist* the infection. This antibiotic works 10 times better than normal antibiotics.
| |
| − | The new mutation of the virus creates calcification of the stomach, kidney pain, electric shocks in your testicles, prostate, ovaries and ankle when you walk.
| |
| − | | |
| − | After the application of the Plasma Water of the Second Cup of Life the fever was the confirmation of the virus.
| |
| − | | |
| − | | |
| − |
| |
| − | Before any person enters the room of an infected person, you apply before entering and leaving the room the Plasma Water from the chest down to the toes.
| |
| − | | |
| − | | |
| − | | |
| − | ==== Other ====
| |
| − | Prevent shaking hands with other people and don’t apply the normal welcome kisses and hugging.
| |
| − | | |
| − | | |
| − | | |
| − | == Different additional information ==
| |
| − | | |
| − | === Additional explanation on the fire Nano-coating of the Second Cup of Life ===
| |
| − | The understanding of the fire coating before the winding around the pencil is as follows: You create space gaps in your Nano-coating layers.
| |
| − | | |
| − | Explained in the different Thursday teachings of MT Keshe.
| |
| − | | |
| − | Instead of using the fire Nano-coating you can apply the caustic soda method.
| |
| − | | |
| − | | |
| − | '''The Nano-coating process can be without the chicken mesh present.'''
| |
| − | | |
| − | '''In this process of applying the caustic soda method '''https://en.kfwiki.org/wiki/Category:Nano-coating
| |
| − | | |
| − | | |
| − | === Application with battery or without ===
| |
| − | A nearly flat battery is only used to speed up the process of production of the GANSes.
| |
| − | | |
| − | Instead of using a battery you can place a Copper wire between the connections.
| |
| − | | |
| − | [[File:OneCup OneLife - Soul.jpg|250x250px|thumb|[[Understanding the OneCup OneLife|'''Understanding the Soul''']]]]
| |
| − | | |
| − | | |
| − | === Understanding the Soul of the One Cup One Life ===
| |
| − | '''You never need to dismantle your One Cup One Life. Respect the soul you have created!'''
| |
| − | | |
| − | Link: '''[[Understanding the OneCup OneLife|Understanding the Soul]] of the One Cup One Life'''
| |
| − | | |
| − | | |
| − | === Useful tips ===
| |
| − | You can add on top of each metal plate like your Copper plate (accordion Copper wire) or a new Nano-coated Copper plate. It doesn't need to be big. Make sure it touches the original plate or the wires.
| |
| − | | |
| − | Make sure that your salt water solution is always at 150 grams of salt per one liter of clean water.
| |
| − | | |
| − | Check on regular basis that your battery is not fully flat. Only to be replaced with an already used battery.
| |
| − | | |
| − | In case of real emergency you can use salt water direct from the sea to have your salt solution.
| |
| − | | |
| − | Not a single Second Cup of Life in production should be covered.
| |
| − | | |
| − | === How to produce Amino Acids when your cup is not producing sufficient enough ===
| |
| − | You place your One Cup One Life next to an open window or place it outside for a couple of hours.
| |
| − | | |
| − | You also can place the already finished Plasma Water with the GANS present outside without a cover or near the window. It might take some time, but it will produce Amino Acids.
| |
| − | | |
| − | | |
| − | | |
| − | === Mr. Keshe explained why the application of the Second Cup of Life with this new mutation of the Coronavirus currently present ===
| |
| − | Further updates will follow as we stay ahead of the new mutations of the Corona Virus
| |
| − | | |
| − | ==== Application prevention and reversal ====
| |
| − | The field strength of the GANS is continuously transferred to the water.
| |
| − | | |
| − | The field strength of the Plasma Water depletes the energy from the virus from its stronger field strength. Because it depletes the virus from its field strength it incapacitates the virus.
| |
| − | | |
| − | == Important ==
| |
| − | | |
| − | === Protect and check ===
| |
| − | Keep checking by applying the Plasma Water of the Second Cup of Life if there are any signs of Kidney pain, electric shocks in your testicles, prostate, ovaries, ancle, when you walk.
| |
| − | | |
| − | Because this new variation of the Virus will give you calcification of the stomach.
| |
| − | | |
| − | Still carry on to do the nose and breath test.
| |
| − | | |
| − | ==== Do the nose and breath test ====
| |
| − | Pinch your nose with your fingers and hold your breath for 10 seconds every morning. If you don’t cough within the 10 seconds and if can hold your breath for 10 seconds, you are okay.
| |
| − | | |
| − | Start testing this 3 times a day.
| |
| − | | |
| − | Spray your body with the Plasma Water of the Second Cup of Life. If you feel any pain or any pressure that is discomfortable, please be alerted you might be infected. Test yourself.
| |
| − | | |
| − | | |
| − | | |
| − | ==== Other signs to look for ====
| |
| − | Other signs are cold sweats, feeling feverish, but no actual fever present.
| |
| − | | |
| − | Bad headache.
| |
| − | | |
| − | Pressure and severe pain felt when you test spray with the Plasma Water from the Second Cup of Life and the One Cup One Life: On your body, starting from the head, neck, chest, kidneys, stomach, ovaries, womb, testicles, prostate, knees and toes and you first reaction is severe headache, severe swollen tongue and very difficulty to breath and swallow food, no appetite and always want to sleep. (Most people don't show any signs of fever anymore. You should be on high alert. These are the signs of Corona Virus infection.)
| |
| − | | |
| − | At this given moment you have to check for extra signs like pains in the femur, kidneys, knees, toes, these are the signs you have to look for.
| |
| − | | |
| − | <u>
| |
| − | If any of these symptoms are present, please let us know in our available channels at the end of this document.</u>
| |
| − | | |
| − | | |
| − | | |
| − | === Links for help ===
| |
| − | | |
| − | You will find help in the following international Telegram language groups.
| |
| − | | |
| − | Keshe One World Family: https://t.me/joinchat/I2ksVVbvb7OjcDR_3qSugQ
| |
| − | | |
| − | Established language groups on Telegram and are expanding every day, are Portuguese, Farsi, Italian, German, Nordic, Maltese, Netherlands, Canadian, French, Romanian, Spanish, Keshe One World Family and more will follow as you are applying for it.
| |
| − | | |
| − | | |
| − | First edition video of the One Cup One Life created for the first emergency relief in China: [https://mega.nz/#F!RXwi2QSb!HqqCqSiflkaD7X5FFssnMg h][https://mega.nz/#F!RXwi2QSb!HqqCqSiflkaD7X5FFssnMg ttps://mega.nz/#F!RXwi2QSb!HqqCqSiflkaD7X5FFssnMg]
| |
| − | | |
| − | | |
| − | | |
| − | === Finishing words ===
| |
| − | | |
| − | Keep strictly to the above described "Applications to prevent and in case of any infection!"
| |
| − | | |
| − | In case of any infection please contact the www.keshefoundation.org webmaster or try to find the Universal Council language member, Universal Council support member, or the nearest Knowledge Seeker.
| |
| − | | |
| − | Collect as much data possible of your observations and freely share your knowledge.
| |
| − | | |
| − | Come and share your knowledge in the public testimonials: [[:Category:Testimonials|Public Meeting for Testimonials]]
| |
| − | | |
| − | Be careful and cautious!
| |
| − | | |
| − | | |
| − | | |
| − | As it is mentioned above about the Twin Cups One Cup One Life the complete information will be added in the near future.
| |
| − | | |
| − | On M.T.Keshe's request you received the knowledge about the One Cup One Life, please pass on the knowledge and teach 10 more people about the One Cup One Life and request from the people you teach they teach 10 more as a promise to receive this free gift to give freely.
| |
| − | | |
| − | '''We are here to serve and not to be served!'''
| |
| − | | |
| − | '''We request freely for you to sign the''' [[World Peace Treaty]].
| |
| − | | |
| − | | |
| − | This page and information was updated 2020-03-19
| |
| − | | |
| − | === Information directly from Mr Keshe ===
| |
| − | | |
| − | 320<sup>th</sup> Knowledge Seekers Workshop - Segment
| |
| − | | |
| − | 1 hr 17 mins 46 secs
| |
| − | | |
| − | One point is, 'That we need to stay collectively calm and focused.' And, one point is, 'The new way to handle it is very direct.' Protocols, according to change of the virus, changes that you have to follow. Because, it's very much what I said, “The people who make the vaccination are stuck with the old, and they take them long time to find out, before they do, and before make vaccine. The protocol has changed, since we have seen the virus moving down, we have added a new protocol. And, that is, you make many cups. In one of the cups, you take the zinc out of the circulation, and you put only nano coated material and the copper, and you produce a pure CUO. With this, you collect the amino acid on top all the time, and you keep on washing it. And, at the same time, keep some of the salt separately, salt water inside separately, with some of the gans of the copper.
| |
| − | | |
| − | With a new evolution in the Corona, you need a copper gans, for two reasons: From lung down everything is mainly muscles, even your arms, there is not that much muscle above the, what we call, 'lung diaphragm, the top level. This part is mainly made of copper connection muscles, so, it responds very rapidly to copper. Secondly, copper gans water, with few drops of its salt in it, is one of the best antibiotics you ever put your hands on. It's many times more effective in killing germs, than actually any antibiotic we know. So, we have evolved with this.
| |
| − | | |
| − | The doctors, the Medical Team, I've given a specific advice on the Iranian Channel, 'That you can use again patches of copper, with CO2 (CUO?), on these organs, like liver and kidney, back and the front.' And, there's no direct contact, and you can withdraw it, for womb, for ovaries, for muscles, leg muscles, and foot. At the same time, you use a CUO direct, its ganses water. The ganses water for disinfection, very powerful! But, you have to allow some of the, very minute amount of gans of copper to be in that mixture. Because, it will stay behind permanently to keep disinfecting, the same as the salt spray. You can add the, very small amount of CUO in the salt water, where you wash, where you're cleaning the copper, and use as disinfectant. This is one of the most powerful disinfectants we can recommend at this moment to be used.
| |
| − | | |
| − | When you make the copper gans, when you're washing it, keep the salt, and add very, very small amount of copper into it, for disinfecting the room and the offices. Because now, we are dealing with a different strength virus, and we have to change the protocol. We have put a new protocol to the Iranian doctors, and this is exclusively and explicitly for the doctor's recommendation. As we've seen many of you go with no signs, when the virus is overcome, in your kidneys, in your liver, or the brain, or the lung, through the second infection. At the present medical protocol, as I was discussing with Dr. Assidi of Iran, this morning, he said, “We don't understand the protocol? International protocol says, 'You do not use antibiotics with virus.' Because, it gives it more chance to grow rapidly.” Yes, this is correct with the old protocol! Because, they had no tools to, in a way, overcome the virus. Now, with the gans (Corona?) virus we deplete the energy, and this leaves a massive amount of damaged cells behind, that we have to wait to accumulate to become a, what we call, 'fever.'
| |
| − | | |
| − | The protocol to the doctors for their patients, from the Keshe Foundation, from today is as follows, from the minute you have the confirmation, you prescribe to your patients the following:
| |
| − | | |
| − | Use of the gans of Cup of Life. Spraying every day, at least 3, 4 times a day. '''This is for those who are infected, not for public. Do not do this! This is only for doctors, as we cannot reach you in any other way.''' Then, the spray, the body from abdomen down with gans of CUO. Critical cases, CUO directly in a patch on the skin, back and the front, to overcome within 3 to 6 hours. Then, you withdraw the patch, and you go on a spray. The use of CUO, plus small amount of gans of salt, or the salt from the CUO patch direct, to be administered at 50 ml for every half an hour, at the critical point when the infection is confirmed, or visible? This is used as antibiotic, if there is no antibiotic available. From the beginning, when you see the signs, you administer antibiotics, like (Amoxycillin?) From the time you start the process of the spraying the body, that the body goes through the reversal of the virus, and the damaged cells, together. This way you get a rapid result, and the extent of the weakness afterwards is much shorter, because the two are handled together.
| |
| − | | |
| − | The protocol, medical protocol international is: 'Do not use antibiotic during the crisis.' This is correct! But, the New Technology, as I repeat it again, 'We take the virus away, which is unknown to the present world of medicine. You administer antibiotic at the same time, or the use of the Gans CUO, 50 ml per hour for the first 6 to 12 hours of discovery of the infection. And, after that, you dont need to use anymore, what we call, 'the patches.' Then, you reduce the use of the CUO as antibiotic to 50 ml, 3 times a day for 7 days, and stop. The new protocol has to be followed using the copper gans salt water, with small amount of copper, to disinfect the environment, to handle the new variation. You can add some of the Cup of Life water into this for disinfection.
| |
| − | | |
| − | We have taken a new step with critical conditions in Iran, and that is, 'We take a Cup of Life Water, or we take a Cup of Life Gans, we add 20 to 30% copper gans directly into it. And, we use that mixture, both for spraying the body from ba, from down and, in so many ways, and nothing else. This is the only time you use the mixture. The breathing has to carry on the same. Infected people, at least in the first 24 hours, 10 to 20 minutes every hour. And, to drink of the water. For those who infected with new version of the virus, has to go to half a liter every hour. At least 300 ml to half a liter every hour, that it cleans, it takes the energy, and it sorts out the problem with the kidney and intestine. We will update further next week, as the variation changes? Do not forget, 'The toe is as much can be affected as the brain at this moment.' But, the toe will be through the bone marrow, and the head will be through the brain. One through the strength of the physicality, and one through the strength of the soul.
| |
| − | | |
| − | 1 hr 28 mins 48 secs
| |
| − | | |
| − | === Carry on applying the First One Cup One Life application as follow: ===
| |
| − | You harvest the washed Plasma Water from the Second Cup of Life 300ml.
| |
| − | | |
| − | You harvest the washed Plasma Water from your One Cup One Life 50ml.
| |
| − | | |
| − | You harvest the washed Plasma Water from your Twin Cup One Cup One Life 50ml.
| |
| − | | |
| − | You harvest the washed Plasma Waters from the different One Cup One Life Cups 50ml and put all the collected Plasma Waters together in a extra reserve bottle.
| |
| − | | |
| − | APPLY THIS MIXTURE TWICE A DAY IN A SPRAY BOTTLE OR WASHING THE BODY FROM BREAST DOWN ONLY.
| |
| | | | |
| − | Plasma Water in little sips during the period of 24 hours.
| + | === Reuse of the caustic solution === |
| | + | The saved caustic solution can be reused for a nano-coating process or other different purposes (e.g. [[Perfect mixture for garden watering]]). For making another Nano-coating process, you can just empty it in another nano-coating box with Copper Infinity Loops, coils or plates. |
Introduction
Infinity Loops absorb and protect from different fields, like radiations and other influencing environmental factors (5G, chemtrails, computer, mobile phone, pulsed high frequency radiation and so on).
Production of the bare Infinity Loops
Required Equipment
First the Copper wire is prepared and the Infinity Loops are formed. For this process you need:
- stranded Copper wire
- cutting pliers, or scissors
- knife
Preparation of the Copper stranded wire
Stranded wire is characterized by the fact that many small strands together form a wire. (See photo). You can find it in the hardware store, at an electrical store, or in an emergency, at home, in the power cables of your hair dryer, radio, television, coffee machine, etc. To do this, simply unplug the power cable from the outlet. Cut the entire electrical cord off of the appliance to use the whole cord.
Depending on the desired size of the Infinity Loops, select the length of the Copper wire. 20 cm of Copper wire results in a 6-8 cm long Infinity Loop, which can be attached to a mobile phone. If you want to position them on the Computer, Television, around the house, or on windows, they can also be larger. But it is not necessary to fill for example the whole window in the size. A length of 8, 10, 15 cm is completely sufficient.
If you want to make many Ininity Loops at once, you may need a long Copper wire. From this you can remove all the plastic and then cut it into the desired lengths. How to remove the plastic from the wire, is explained in the following steps.
Removing the plastic from the wire
Usually there are two or three wires in a power cable. The plastic outer sheath must first be removed. There are several ways to do this. (If you buy stranded wires separately, this step is not necessary)
Variant 1
One way to remove the outer sheath is to have the knife in one hand, place the cable on it and press it with your thumb carefully. With the other hand, as well as with the thumb you turn the cable and the knife cuts deeper and deeper into the plastic. Once you have reached the inner wires you can pull the separated plastic part from the inner wires. This is how you proceed step by step until the inner cables are exposed.
Variant 2
Another possibility is to place the cable on the table and hold it with one hand. Press the blade at a slight angle and with the other hand simply pull the cable backwards against the cutting direction. This way you take off a part of the plastic and can take the wires out.
Everyone has different approaches. With a little bit of trying you will find what way works best for you.
Stripping off the plastic around the strands
Now you have exposed 2 or 3 wires, which are also covered with plastic. For these wires it is best to use variant 2 to remove the plastic. Do the same as above, especially with the stranded wire, it might require some practice. Put the knife with the cutting edge back at a slight angle, with a little pressure on the plastic, and pull the wire with the other hand underneath. If you hold the knife too steep, or press too hard, you might cut into the thin strands. If you hold the knife too loosely you might slide up over the plastic and start again at the same place. Don't worry, a few cut-through strands are no problem. With some practice you will get better quickly. Remove the plastic completely.
Twisting together the individual strands of the wire
Hold one end of the wire strands in one hand and the other end in the other hand. With your fingers twist the strands together starting on one end and continue to twist all the way to the other end. Make sure you are twisting the strands firmly together and have secured any fine strands that were cut short into the group.
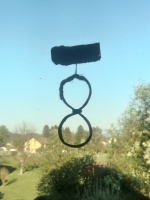
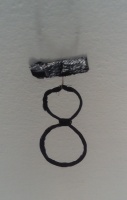
Creating the Infinity Loop
Now the Infinity Loop gets formed.
The wire is formed into a circle with the two ends crossing each other and extending 1-2 cm beyond the circle.
Twist the ends with the circle.
Take the circle in both hands between your fingers and turn one side 180 degrees to form an eight.
Take one or more single strands and wrap the middle part so that it fits tight.
Wrap one strand around the area where you have connected the Infinity Loop wire. This strand will later be used to hang the Infinity Loops for the nano-coating process.
(It is important that the area where you have connected the Infinity Loop wire is on top, as it will be easier to reach it later with the poles of the multimeter).
Nano-coating Process with NaOH
Required Equipment
When the Infinity Loops are formed, they become nano-coated. For this process you need:
- Ready-made Copper Infinity Loops
- A plastic container with lid (not too big)
- (Weight to weigh down the lid if it cannot close tightly itself.)
- ~ 50 grams of pure NaOH flakes or beads on 1 liter distilled water. (Do not use drain cleaners. You can buy it in art shops; it is used to remove paint as alkaline-based stripper, or in chemist's/drugstore)
- Distilled water (according to the quantity of Infinity Loops and size of the plastic container) (e.g. 3 l water and ~150 grams of NaOH)
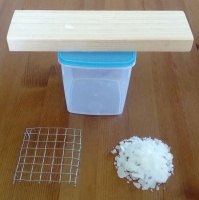
- Chicken mesh (Grid out of Iron which is coated with Zinc)
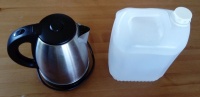
- Electric kettle or stove top to boil water
- Multimeter (or battery with wires)
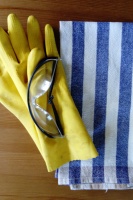
- Safety equipment [Gloves, safety goggles, breathing protection (cloth, mask), skin protection (face covering, long clothing)]
Plastic box with lid and weight, chicken mesh and NaOH flackes
Electric kettle and distilled water
Gloves, safty goggles, cloth
Preparing the plastic box for the Nano-coating process
This example is one way you can make your nano-coating box.
Here two holes were made with a glowing Copper wire, pressed against the plastic at the areas, where the holes should be. After that, two solid Copper wires got twisted together, to be able to carry the weight of the later hung up Infinity Loops. Both ends are put through the two holes in the inside. The Copper wire goes around the plastic box and is fixed with hot glue. Also the holes in the plastic box were sealed with hot glue.
Measuring how much water (and NaOH) is needed
Before you go to the next step, you have to determine how much water is needed. To do this, you can hang an Infinity Loop inside and fill the box with water until the whole Infinity Loop is under water. The water must not be higher than the holes in the plastic box that were made to put the suspension wires through. Otherwise the later caustic solution can eat through the hot glue and run out. The hot glue only serves to prevent the fumes from escaping later. Now you can empty your water in a measuring cup and you know exactly, how much water you need. (You just add a little bit more water, because through the later boiling of the water, a part of it vaporize and is and is otherwise missing.)
Phase 1: Hot Caustic Bath (2 to 3 days)
Now, before you go any further, you'll put on your safety gear! NaOH is an extremely corrosive material and any eye, skin contact or inhalation of the vapours should be avoided completely. Put on gloves, goggles, respiratory protection (mask, towel, ...) and also long clothes to cover and protect the skin completely.
Now you know how much water you need and also you can calculate with it, how much NaOH you need. For 1 liter distilled water you need approximately 50 grams of NaOH. (So for example 750 milliliter you need approximately 37,5 grams of NaOH). Empty the NaOH in your cup.
Cut the chicken mesh so that it fits into the box. Bend the sides so that it is 1 to 2 cm above the bottom, when you put it in the box. (The Infinity Loops must not touch the chicken wire later).
The Infinity Loops are hung up and fixed in the box. They should not touch each other and should also be fixed in such a way that they cannot really turn or move.
For the next step you should be on the fresh air, because hot caustic steam will rise up. Also wear your whole safety equipment! Cover your whole skin! Be careful!
Take an old cleaning shreds, or towel and place it on the ground. (If the hot caustic solution gets on a surface, like grass or every other ground it will cauterize and leave its tracks.)
Place the box on it and ensure, that the lid (and weight) is handy to close the box. (In this example no weight is used to weigh down the lid, because the lid itself closes very well and strong alone)
Boil the water in a kettle or cooking pot. When the water boils, pour it into the box. Don't lean over the box and keep your distance as much as possible. The hot, pungent fumes are coming up. The water and NaOH in the box will also boil and splash out. Don't pour too much and too quickly at once, otherwise there will be small "explosions" and a lot of spurting out. It should also not take too long, because the first 5-10 seconds are very important for opening up the Copper atoms and a well nano-coating. Once the Infinity Loops are covered, close the lid.
In case you get splashes of the caustic solution in your eyes or on your skin, water should be available. You wash your eyes or your skin with it. If CO2 plasma water is available, it can also be used.
Ideally you should then leave the box in a warm place (30-40 degrees) and wait at least 2-3 days before proceeding with the next step.
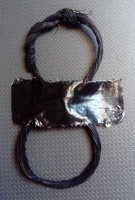
Phase 2: Growing of the Nano-Layers (min. 2 days)
It can be, but it don't has to be, that a few Infinity Loops turned already to a darker, black colour. The next step is, to empty the caustic solution into a plastic bottle and save it for another reuse (Reuse of the caustic solution). Let around 5 mm of the caustic solution at the bottom of the box, close the lid and give the box to a worm place for minimum of two days. (30-40 degrees are optimal. So it is steaming, it has a little moisture and new nano-layers can build up. The longer this process goes on, the more layers can build up and the stronger the coating is.)
Take every 6 hours a multimeter (set on mv) and touch with the negative pole one end of the Infinity Loop wire and with the positive pole the other end of the wire to align the nano-layers. (The values on the multimeter are jumping). In case you have no multimeter, you can also use a battery. You connect the plus pole with one Copper wire and the minus pole with one Copper wire. With this two wires you can do the same process. The Infinity Loops become blacker and blacker.
Using a battery instead of the multimeter
In case you don't have a multimeter, you can also use a 1,5 Volt battery. Just take 2 Copper wires and strip the plastic at their ends of. You connect one wire on the battery plus pole and one wire on the battery minus pole. Use a adhesive tape to attach the end of both wires in the middle of the poles tightly. You can use it like the multimeter.
Phase 3: Washing of the Nano-material
Now you can empty the rest of the caustic solution out of the box and put up the lid in a way, that a little air comes all the time into the box. So the Nano-coating can dry slowly. Till the Infinity Loops are dry, it can also take a few days, depending on the caustic leftovers in the box and how much air comes into the box. You can also continue using the multimeter (or battery). When the Infinity Loops are totally dry, they will have white caustic leftovers on it. Even it is only a small veil, or in any case, you have to wash them. Simply pour warm water over the Infinity Loops, pour the whole water out again and repeat the process a few times. Then place the box open in a warm place, where the Infinity Loops can dry quickly.
Using the Infinity Loops
To hang or attach the Infinity Loops somewhere, you can use e.g. a thread and/or adhesive tape. You can place them around your house, in rooms and everywhere you wish to absorb not wanted fields and to be protected.
Additional Information
Reuse of the caustic solution
The saved caustic solution can be reused for a nano-coating process or other different purposes (e.g. Perfect mixture for garden watering). For making another Nano-coating process, you can just empty it in another nano-coating box with Copper Infinity Loops, coils or plates.