Difference between revisions of "Testpage general"
(Tag: Visual edit) |
(added "pulsed high frequency radiation" in the introduction, corrected two minimal things in the text, nothing important ( a "n" eight, high"ly"). Anyway, well done, and hopefully will be checked by a native speaker soon....) |
||
| (155 intermediate revisions by 2 users not shown) | |||
| Line 1: | Line 1: | ||
| − | + | == Introduction == | |
| − | + | Infinity Loops absorb and protect from different fields, like radiations and other influencing environmental factors (5G, chemtrails, computer, mobile phone, pulsed high frequency radiation and so on). | |
| − | + | == Production of the bare Infinity Loops == | |
| − | + | === Required Equipment === | |
| + | <u>First the Copper wire is prepared and the Infinity Loops are formed. For this process you need:</u> | ||
| − | + | * stranded Copper wire | |
| + | * cutting pliers, or scissors | ||
| + | * knife | ||
| + | <gallery widths="200" heights="200" mode="nolines"> | ||
| + | File:Infinity Loop 1g.jpg| | ||
| + | </gallery> | ||
| − | |||
| − | + | === Preparation of the Copper stranded wire === | |
| − | + | Stranded wire is characterized by the fact that many small strands together form a wire. (See photo). You can find it in the hardware store, at an electrical store, or in an emergency, at home, in the power cables of your hair dryer, radio, television, coffee machine, etc. To do this, simply '''unplug''' the power cable from the outlet. Cut the entire electrical cord off of the appliance to use the whole cord. | |
| − | + | Depending on the desired size of the Infinity Loops, select the length of the Copper wire. 20 cm of Copper wire results in a 6-8 cm long Infinity Loop, which can be attached to a mobile phone. If you want to position them on the Computer, Television, around the house, or on windows, they can also be larger. But it is not necessary to fill for example the whole window in the size. A length of 8, 10, 15 cm is completely sufficient. | |
| − | + | If you want to make many Ininity Loops at once, you may need a long Copper wire. From this you can remove all the plastic and then cut it into the desired lengths. How to remove the plastic from the wire, is explained in the following steps. | |
| − | |||
| − | |||
<gallery mode="nolines" widths="200" heights="200"> | <gallery mode="nolines" widths="200" heights="200"> | ||
| Line 25: | Line 28: | ||
File:OneCup OneLife - Stranded wire.jpg| | File:OneCup OneLife - Stranded wire.jpg| | ||
</gallery> | </gallery> | ||
| − | ==Removing the plastic from the wire== | + | |
| + | |||
| + | ====Removing the plastic from the wire==== | ||
Usually there are two or three wires in a power cable. The plastic outer sheath must first be removed. There are several ways to do this. (If you buy stranded wires separately, this step is not necessary) | Usually there are two or three wires in a power cable. The plastic outer sheath must first be removed. There are several ways to do this. (If you buy stranded wires separately, this step is not necessary) | ||
| − | ===Variant 1=== | + | |
| + | |||
| + | =====Variant 1===== | ||
One way to remove the outer sheath is to have the knife in one hand, place the cable on it and press it with your thumb carefully. With the other hand, as well as with the thumb you turn the cable and the knife cuts deeper and deeper into the plastic. Once you have reached the inner wires you can pull the separated plastic part from the inner wires. This is how you proceed step by step until the inner cables are exposed.<gallery mode="nolines" widths="200" heights="200"> | One way to remove the outer sheath is to have the knife in one hand, place the cable on it and press it with your thumb carefully. With the other hand, as well as with the thumb you turn the cable and the knife cuts deeper and deeper into the plastic. Once you have reached the inner wires you can pull the separated plastic part from the inner wires. This is how you proceed step by step until the inner cables are exposed.<gallery mode="nolines" widths="200" heights="200"> | ||
File:OneCup OneLife - Cutting and Stripping off the wire 1.jpg| | File:OneCup OneLife - Cutting and Stripping off the wire 1.jpg| | ||
| Line 35: | Line 42: | ||
File:OneCup OneLife - Cutting and Stripping off the wire 5.jpg| | File:OneCup OneLife - Cutting and Stripping off the wire 5.jpg| | ||
</gallery> | </gallery> | ||
| − | ===Variant 2=== | + | |
| + | =====Variant 2===== | ||
Another possibility is to place the cable on the table and hold it with one hand. Press the blade at a slight angle and with the other hand simply pull the cable backwards against the cutting direction. This way you take off a part of the plastic and can take the wires out. | Another possibility is to place the cable on the table and hold it with one hand. Press the blade at a slight angle and with the other hand simply pull the cable backwards against the cutting direction. This way you take off a part of the plastic and can take the wires out. | ||
| Line 45: | Line 53: | ||
File:OneCup OneLife - Cutting the plastic around the wires with a knife 5.jpg| | File:OneCup OneLife - Cutting the plastic around the wires with a knife 5.jpg| | ||
</gallery> | </gallery> | ||
| − | ==Stripping off the plastic around the strands== | + | |
| − | Now you have exposed 2 or 3 wires, which are also covered with plastic. For these wires it is best to use variant 2 to remove the plastic. Do the same as above, especially with the stranded wire, it might require some practice. Put the knife with the cutting edge back at a slight angle, with a little pressure on the plastic and pull the wire with the other hand underneath. If you hold the knife too steep, or press too hard, you might cut into the thin strands | + | ====Stripping off the plastic around the strands==== |
| + | Now you have exposed 2 or 3 wires, which are also covered with plastic. For these wires it is best to use variant 2 to remove the plastic. Do the same as above, especially with the stranded wire, it might require some practice. Put the knife with the cutting edge back at a slight angle, with a little pressure on the plastic, and pull the wire with the other hand underneath. If you hold the knife too steep, or press too hard, you might cut into the thin strands. If you hold the knife too loosely you might slide up over the plastic and start again at the same place. Don't worry, a few cut-through strands are no problem. With some practice you will get better quickly. Remove the plastic completely.<gallery mode="nolines" widths="200" heights="200"> | ||
File:OneCup OneLife - Stripping of plastic around the strands 1.jpg| | File:OneCup OneLife - Stripping of plastic around the strands 1.jpg| | ||
File:OneCup OneLife - Stripping of plastic around the strands 2.jpg| | File:OneCup OneLife - Stripping of plastic around the strands 2.jpg| | ||
| Line 52: | Line 61: | ||
File:OneCup OneLife - Stripping of plastic around the strands 4.jpg| | File:OneCup OneLife - Stripping of plastic around the strands 4.jpg| | ||
</gallery> | </gallery> | ||
| − | ==Twisting together the individual strands of the wire== | + | |
| − | Hold one end of the wire strands in one hand and the other end in the other hand. With your fingers twist the strands together starting on one end and continue to | + | ====Twisting together the individual strands of the wire==== |
| + | Hold one end of the wire strands in one hand and the other end in the other hand. With your fingers twist the strands together starting on one end and continue to twist all the way to the other end. Make sure you are twisting the strands firmly together and have secured any fine strands that were cut short into the group.<gallery mode="nolines" widths="200" heights="200"> | ||
File:OneCup OneLife - Twisting the strands together 1.jpg| | File:OneCup OneLife - Twisting the strands together 1.jpg| | ||
File:OneCup OneLife - Twisting the strands together 2.jpg| | File:OneCup OneLife - Twisting the strands together 2.jpg| | ||
| Line 60: | Line 70: | ||
File:OneCup OneLife - Twisting the strands together 5.jpg| | File:OneCup OneLife - Twisting the strands together 5.jpg| | ||
</gallery> | </gallery> | ||
| − | == | + | |
| − | + | === Creating the Infinity Loop === | |
| − | File: | + | Now the Infinity Loop gets formed. |
| − | File: | + | |
| − | File: | + | The wire is formed into a circle with the two ends crossing each other and extending 1-2 cm beyond the circle. |
| − | File: | + | |
| − | File: | + | Twist the ends with the circle. |
| + | |||
| + | Take the circle in both hands between your fingers and turn one side 180 degrees to form an eight. <gallery widths="200" heights="200" mode="nolines"> | ||
| + | File:Infinity Loop 1.jpg| | ||
| + | File:Infinity Loop 2.jpg| | ||
| + | File:Infinity Loop 3.jpg| | ||
| + | File:Infinity Loop 4.jpg| | ||
| + | </gallery>Take one or more single strands and wrap the middle part so that it fits tight. | ||
| + | |||
| + | Wrap one strand around the area where you have connected the Infinity Loop wire. This strand will later be used to hang the Infinity Loops for the nano-coating process. | ||
| + | |||
| + | (It is important that the area where you have connected the Infinity Loop wire is on top, as it will be easier to reach it later with the poles of the multimeter).<gallery widths="200" heights="200" mode="nolines"> | ||
| + | File:Infinity Loop 5.jpg| | ||
| + | File:Infinity Loop 6.jpg| | ||
| + | File:Infinity Loop 8.jpg| | ||
| + | File:Infinity Loop 9.jpg| | ||
</gallery> | </gallery> | ||
| − | |||
| − | |||
| − | |||
| − | + | == Nano-coating Process with NaOH == | |
| − | File: | + | |
| − | + | === Required Equipment === | |
| − | File: | + | |
| − | File: | + | <u>When the Infinity Loops are formed, they become nano-coated. For this process you need:</u> |
| − | File: | + | |
| − | + | * Ready-made Copper Infinity Loops | |
| − | + | * A plastic container with lid (not too big) | |
| + | * (Weight to weigh down the lid if it cannot close tightly itself.) | ||
| + | * ~ 50 grams of pure NaOH flakes or beads on 1 liter distilled water. (Do not use drain cleaners. You can buy it in art shops; it is used to remove paint as alkaline-based stripper, or in chemist's/drugstore) | ||
| + | * Distilled water (according to the quantity of Infinity Loops and size of the plastic container) (e.g. 3 l water and ~150 grams of NaOH) | ||
| + | * Chicken mesh (Grid out of Iron which is coated with Zinc) | ||
| + | * Electric kettle or stove top to boil water | ||
| + | * Multimeter (or battery with wires) | ||
| + | * Safety equipment [Gloves, safety goggles, breathing protection (cloth, mask), skin protection (face covering, long clothing)] | ||
| + | <gallery widths="200" heights="200" mode="nolines"> | ||
| + | File:Infinity Loop 10d.jpg|Plastic box with lid and weight, chicken mesh and NaOH flackes | ||
| + | File:Infinity Loop 10f.jpg|Electric kettle and distilled water | ||
| + | File:Infinity Loop 10a.jpg|Multimeter or battery | ||
| + | File:Infinity Loop 1f.jpg|Gloves, safty goggles, cloth | ||
</gallery> | </gallery> | ||
| − | |||
| − | |||
| − | |||
| − | |||
| − | |||
| − | + | === Preparing the plastic box for the Nano-coating process === | |
| + | This example is one way you can make your nano-coating box. | ||
| − | + | Here two holes were made with a glowing Copper wire, pressed against the plastic at the areas, where the holes should be. After that, two solid Copper wires got twisted together, to be able to carry the weight of the later hung up Infinity Loops. Both ends are put through the two holes in the inside. The Copper wire goes around the plastic box and is fixed with hot glue. Also the holes in the plastic box were sealed with hot glue. | |
| − | |||
| − | |||
| − | |||
| − | + | <gallery widths="200" heights="200" mode="nolines"> | |
| − | File: | + | File:Infinity Loop 10.jpg| |
| − | File: | + | File:Infinity Loop 11.jpg| |
| + | File:Infinity Loop 12.jpg| | ||
</gallery> | </gallery> | ||
| − | = | + | |
| − | == | + | ===Measuring how much water (and NaOH) is needed === |
| − | To | + | Before you go to the next step, you have to determine how much water is needed. To do this, you can hang an Infinity Loop inside and fill the box with water until the whole Infinity Loop is under water. The water must not be higher than the holes in the plastic box that were made to put the suspension wires through. Otherwise the later caustic solution can eat through the hot glue and run out. The hot glue only serves to prevent the fumes from escaping later. Now you can empty your water in a measuring cup and you know exactly, how much water you need. (You just add a little bit more water, because through the later boiling of the water, a part of it vaporize and is and is otherwise missing.)<gallery widths="200" heights="200" mode="nolines"> |
| − | File: | + | File:Infinity Loop 141a.jpg| |
| − | |||
| − | |||
</gallery> | </gallery> | ||
| − | == | + | |
| − | + | ===Phase 1: Hot Caustic Bath (2 to 3 days) === | |
| − | File: | + | {| class="floatright" background:#F9F9F9; " |
| − | File: | + | | <youtube width="400" height="220">https://www.youtube.com/watch?v=U7YG-vMm_q8&feature=youtu.be</youtube> |
| − | File: | + | |} |
| + | '''<big>Now, before you go any further, you'll put on your safety gear! NaOH is an extremely corrosive material and any eye, skin contact or inhalation of the vapours should be avoided completely. Put on gloves, goggles, respiratory protection (mask, towel, ...) and also long clothes to cover and protect the skin completely.</big>''' | ||
| + | |||
| + | Now you know how much water you need and also you can calculate with it, how much NaOH you need. For 1 liter distilled water you need approximately 50 grams of NaOH. (So for example 750 milliliter you need approximately 37,5 grams of NaOH). Empty the NaOH in your cup. | ||
| + | |||
| + | Cut the chicken mesh so that it fits into the box. Bend the sides so that it is 1 to 2 cm above the bottom, when you put it in the box. (The Infinity Loops must not touch the chicken wire later). | ||
| + | |||
| + | <gallery widths="200" heights="200" mode="nolines"> | ||
| + | File:Infinity Loop 13.jpg| | ||
| + | File:Infinity Loop 14.jpg| | ||
| + | File:Infinity Loop 15.jpg| | ||
| + | </gallery>The Infinity Loops are hung up and fixed in the box. They should not touch each other and should also be fixed in such a way that they cannot really turn or move. | ||
| + | |||
| + | <gallery widths="200" heights="200" mode="nolines"> | ||
| + | File:Infinity Loop 16.jpg| | ||
| + | File:Infinity Loop 17.jpg| | ||
| + | File:Infinity Loop 20.jpg| | ||
| + | </gallery>'''<big>For the next step you should be on the fresh air, because hot caustic steam will rise up. Also wear your whole safety equipment! Cover your whole skin! Be careful!</big>''' | ||
| + | |||
| + | Take an old cleaning shreds, or towel and place it on the ground. (If the hot caustic solution gets on a surface, like grass or every other ground it will cauterize and leave its tracks.) | ||
| + | |||
| + | Place the box on it and ensure, that the lid (and weight) is handy to close the box. (In this example no weight is used to weigh down the lid, because the lid itself closes very well and strong alone) | ||
| + | |||
| + | Boil the water in a kettle or cooking pot. When the water boils, pour it into the box. Don't lean over the box and keep your distance as much as possible. The hot, pungent fumes are coming up. The water and NaOH in the box will also boil and splash out. Don't pour too much and too quickly at once, otherwise there will be small "explosions" and a lot of spurting out. It should also not take too long, because the first 5-10 seconds are very important for opening up the Copper atoms and a well nano-coating. Once the Infinity Loops are covered, close the lid. | ||
| + | |||
| + | <u>In case you get splashes of the caustic solution in your eyes or on your skin, water should be available. You wash your eyes or your skin with it. If CO2 plasma water is available, it can also be used.</u> | ||
| + | |||
| + | Ideally you should then leave the box in a warm place (30-40 degrees) and wait at least 2-3 days before proceeding with the next step. <gallery widths="200" heights="200" mode="nolines"> | ||
| + | File:Infinity Loop 21.jpg| | ||
| + | File:Infinity Loop 23.jpg| | ||
| + | File:Infinity Loop 24.jpg| | ||
| + | File:Infinity Loop 25.jpg| | ||
</gallery> | </gallery> | ||
| − | |||
| − | |||
| − | |||
| − | |||
| − | + | ===Phase 2: Growing of the Nano-Layers (min. 2 days) === | |
| − | + | It can be, but it don't has to be, that a few Infinity Loops turned already to a darker, black colour. The next step is, to empty the caustic solution into a plastic bottle and save it for another reuse ([[Testpage general#Reuse of the caustic solution|Reuse of the caustic solution]]). Let around 5 mm of the caustic solution at the bottom of the box, close the lid and give the box to a worm place for minimum of two days. (30-40 degrees are optimal. So it is steaming, it has a little moisture and new nano-layers can build up. The longer this process goes on, the more layers can build up and the stronger the coating is.) | |
| − | |||
| − | |||
| − | |||
| − | |||
| − | |||
| − | + | <gallery widths="200" heights="200" mode="nolines"> | |
| − | File: | + | File:Infinity Loop 27.jpg| |
| − | File: | + | File:Infinity Loop 29.jpg| |
| − | File: | + | File:Infinity Loop 32.jpg| |
| − | </gallery> | + | </gallery>Take every 6 hours a multimeter (set on mv) and touch with the negative pole one end of the Infinity Loop wire and with the positive pole the other end of the wire to align the nano-layers. (The values on the multimeter are jumping). In case you have no multimeter, you can also use a battery. You connect the plus pole with one Copper wire and the minus pole with one Copper wire. With this two wires you can do the same process. The Infinity Loops become blacker and blacker. |
| − | |||
| − | |||
| − | |||
| − | |||
| − | |||
| − | |||
| − | |||
| − | |||
| − | |||
| − | |||
| − | + | <gallery widths="200" heights="200" mode="nolines"> | |
| − | + | File:Infinity Loop 40a.jpg| | |
| − | + | File:Infinity Loop 33.jpg| | |
| − | + | File:Infinity Loop 361a.jpg| | |
| − | |||
| − | File: | ||
| − | File: | ||
| − | File: | ||
</gallery> | </gallery> | ||
| + | |||
| + | ==== Using a battery instead of the multimeter ==== | ||
| + | In case you don't have a multimeter, you can also use a 1,5 Volt battery. Just take 2 Copper wires and strip the plastic at their ends of. You connect one wire on the battery plus pole and one wire on the battery minus pole. Use a adhesive tape to attach the end of both wires in the middle of the poles tightly. You can use it like the multimeter.<gallery mode="nolines" widths="200" heights="200"> | ||
| + | File:Infinity Loop 10b.jpg| | ||
| + | File:Infinity Loop 10c.jpg| | ||
| + | </gallery> | ||
| + | |||
| + | === Phase 3: Washing of the Nano-material === | ||
| + | Now you can empty the rest of the caustic solution out of the box and put up the lid in a way, that a little air comes all the time into the box. So the Nano-coating can dry slowly. Till the Infinity Loops are dry, it can also take a few days, depending on the caustic leftovers in the box and how much air comes into the box. You can also continue using the multimeter (or battery). When the Infinity Loops are totally dry, they will have white caustic leftovers on it. Even it is only a small veil, or in any case, you have to wash them. Simply pour warm water over the Infinity Loops, pour the whole water out again and repeat the process a few times. Then place the box open in a warm place, where the Infinity Loops can dry quickly. | ||
| + | |||
| + | <gallery widths="200" heights="200" mode="nolines"> | ||
| + | File:Infinity Loop 41.jpg| | ||
| + | File:Infinity Loop 43.jpg| | ||
| + | File:Infinity Loop 42.jpg| | ||
| + | </gallery> | ||
| + | |||
| + | == Using the Infinity Loops == | ||
| + | To hang or attach the Infinity Loops somewhere, you can use e.g. a thread and/or adhesive tape. You can place them around your house, in rooms and everywhere you wish to absorb not wanted fields and to be protected. | ||
| + | |||
| + | <gallery widths="200" heights="200" mode="nolines"> | ||
| + | File:Infinity Loop 44.jpg|window | ||
| + | File:Infinity Loop 45.jpg|ceiling of the room | ||
| + | File:Infinity Loop 46.jpg|computer | ||
| + | </gallery> | ||
| + | |||
| + | == Additional Information == | ||
| + | |||
| + | === Reuse of the caustic solution === | ||
| + | The saved caustic solution can be reused for a nano-coating process or other different purposes (e.g. [[Perfect mixture for garden watering]]). For making another Nano-coating process, you can just empty it in another nano-coating box with Copper Infinity Loops, coils or plates. | ||
Latest revision as of 06:24, 29 April 2020
Contents
- 1 Introduction
- 2 Production of the bare Infinity Loops
- 3 Nano-coating Process with NaOH
- 4 Using the Infinity Loops
- 5 Additional Information
Introduction
Infinity Loops absorb and protect from different fields, like radiations and other influencing environmental factors (5G, chemtrails, computer, mobile phone, pulsed high frequency radiation and so on).
Production of the bare Infinity Loops
Required Equipment
First the Copper wire is prepared and the Infinity Loops are formed. For this process you need:
- stranded Copper wire
- cutting pliers, or scissors
- knife

Preparation of the Copper stranded wire
Stranded wire is characterized by the fact that many small strands together form a wire. (See photo). You can find it in the hardware store, at an electrical store, or in an emergency, at home, in the power cables of your hair dryer, radio, television, coffee machine, etc. To do this, simply unplug the power cable from the outlet. Cut the entire electrical cord off of the appliance to use the whole cord.
Depending on the desired size of the Infinity Loops, select the length of the Copper wire. 20 cm of Copper wire results in a 6-8 cm long Infinity Loop, which can be attached to a mobile phone. If you want to position them on the Computer, Television, around the house, or on windows, they can also be larger. But it is not necessary to fill for example the whole window in the size. A length of 8, 10, 15 cm is completely sufficient.
If you want to make many Ininity Loops at once, you may need a long Copper wire. From this you can remove all the plastic and then cut it into the desired lengths. How to remove the plastic from the wire, is explained in the following steps.


Removing the plastic from the wire
Usually there are two or three wires in a power cable. The plastic outer sheath must first be removed. There are several ways to do this. (If you buy stranded wires separately, this step is not necessary)
Variant 1
One way to remove the outer sheath is to have the knife in one hand, place the cable on it and press it with your thumb carefully. With the other hand, as well as with the thumb you turn the cable and the knife cuts deeper and deeper into the plastic. Once you have reached the inner wires you can pull the separated plastic part from the inner wires. This is how you proceed step by step until the inner cables are exposed.


Variant 2
Another possibility is to place the cable on the table and hold it with one hand. Press the blade at a slight angle and with the other hand simply pull the cable backwards against the cutting direction. This way you take off a part of the plastic and can take the wires out.
Everyone has different approaches. With a little bit of trying you will find what way works best for you.


Stripping off the plastic around the strands
Now you have exposed 2 or 3 wires, which are also covered with plastic. For these wires it is best to use variant 2 to remove the plastic. Do the same as above, especially with the stranded wire, it might require some practice. Put the knife with the cutting edge back at a slight angle, with a little pressure on the plastic, and pull the wire with the other hand underneath. If you hold the knife too steep, or press too hard, you might cut into the thin strands. If you hold the knife too loosely you might slide up over the plastic and start again at the same place. Don't worry, a few cut-through strands are no problem. With some practice you will get better quickly. Remove the plastic completely.


Twisting together the individual strands of the wire
Hold one end of the wire strands in one hand and the other end in the other hand. With your fingers twist the strands together starting on one end and continue to twist all the way to the other end. Make sure you are twisting the strands firmly together and have secured any fine strands that were cut short into the group.


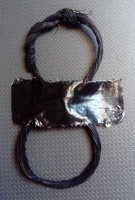
Creating the Infinity Loop
Now the Infinity Loop gets formed.
The wire is formed into a circle with the two ends crossing each other and extending 1-2 cm beyond the circle.
Twist the ends with the circle.
Take the circle in both hands between your fingers and turn one side 180 degrees to form an eight.


Wrap one strand around the area where you have connected the Infinity Loop wire. This strand will later be used to hang the Infinity Loops for the nano-coating process.
(It is important that the area where you have connected the Infinity Loop wire is on top, as it will be easier to reach it later with the poles of the multimeter).


Nano-coating Process with NaOH
Required Equipment
When the Infinity Loops are formed, they become nano-coated. For this process you need:
- Ready-made Copper Infinity Loops
- A plastic container with lid (not too big)
- (Weight to weigh down the lid if it cannot close tightly itself.)
- ~ 50 grams of pure NaOH flakes or beads on 1 liter distilled water. (Do not use drain cleaners. You can buy it in art shops; it is used to remove paint as alkaline-based stripper, or in chemist's/drugstore)
- Distilled water (according to the quantity of Infinity Loops and size of the plastic container) (e.g. 3 l water and ~150 grams of NaOH)
- Chicken mesh (Grid out of Iron which is coated with Zinc)
- Electric kettle or stove top to boil water
- Multimeter (or battery with wires)
- Safety equipment [Gloves, safety goggles, breathing protection (cloth, mask), skin protection (face covering, long clothing)]
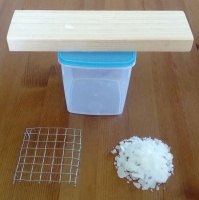
Plastic box with lid and weight, chicken mesh and NaOH flackes
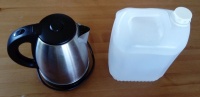
Electric kettle and distilled water

Multimeter or battery

Gloves, safty goggles, cloth


Preparing the plastic box for the Nano-coating process
This example is one way you can make your nano-coating box.
Here two holes were made with a glowing Copper wire, pressed against the plastic at the areas, where the holes should be. After that, two solid Copper wires got twisted together, to be able to carry the weight of the later hung up Infinity Loops. Both ends are put through the two holes in the inside. The Copper wire goes around the plastic box and is fixed with hot glue. Also the holes in the plastic box were sealed with hot glue.


Measuring how much water (and NaOH) is needed
Before you go to the next step, you have to determine how much water is needed. To do this, you can hang an Infinity Loop inside and fill the box with water until the whole Infinity Loop is under water. The water must not be higher than the holes in the plastic box that were made to put the suspension wires through. Otherwise the later caustic solution can eat through the hot glue and run out. The hot glue only serves to prevent the fumes from escaping later. Now you can empty your water in a measuring cup and you know exactly, how much water you need. (You just add a little bit more water, because through the later boiling of the water, a part of it vaporize and is and is otherwise missing.)
Phase 1: Hot Caustic Bath (2 to 3 days)
Now, before you go any further, you'll put on your safety gear! NaOH is an extremely corrosive material and any eye, skin contact or inhalation of the vapours should be avoided completely. Put on gloves, goggles, respiratory protection (mask, towel, ...) and also long clothes to cover and protect the skin completely.
Now you know how much water you need and also you can calculate with it, how much NaOH you need. For 1 liter distilled water you need approximately 50 grams of NaOH. (So for example 750 milliliter you need approximately 37,5 grams of NaOH). Empty the NaOH in your cup.
Cut the chicken mesh so that it fits into the box. Bend the sides so that it is 1 to 2 cm above the bottom, when you put it in the box. (The Infinity Loops must not touch the chicken wire later).


Take an old cleaning shreds, or towel and place it on the ground. (If the hot caustic solution gets on a surface, like grass or every other ground it will cauterize and leave its tracks.)
Place the box on it and ensure, that the lid (and weight) is handy to close the box. (In this example no weight is used to weigh down the lid, because the lid itself closes very well and strong alone)
Boil the water in a kettle or cooking pot. When the water boils, pour it into the box. Don't lean over the box and keep your distance as much as possible. The hot, pungent fumes are coming up. The water and NaOH in the box will also boil and splash out. Don't pour too much and too quickly at once, otherwise there will be small "explosions" and a lot of spurting out. It should also not take too long, because the first 5-10 seconds are very important for opening up the Copper atoms and a well nano-coating. Once the Infinity Loops are covered, close the lid.
In case you get splashes of the caustic solution in your eyes or on your skin, water should be available. You wash your eyes or your skin with it. If CO2 plasma water is available, it can also be used.
Ideally you should then leave the box in a warm place (30-40 degrees) and wait at least 2-3 days before proceeding with the next step.


Phase 2: Growing of the Nano-Layers (min. 2 days)
It can be, but it don't has to be, that a few Infinity Loops turned already to a darker, black colour. The next step is, to empty the caustic solution into a plastic bottle and save it for another reuse (Reuse of the caustic solution). Let around 5 mm of the caustic solution at the bottom of the box, close the lid and give the box to a worm place for minimum of two days. (30-40 degrees are optimal. So it is steaming, it has a little moisture and new nano-layers can build up. The longer this process goes on, the more layers can build up and the stronger the coating is.)


Using a battery instead of the multimeter
In case you don't have a multimeter, you can also use a 1,5 Volt battery. Just take 2 Copper wires and strip the plastic at their ends of. You connect one wire on the battery plus pole and one wire on the battery minus pole. Use a adhesive tape to attach the end of both wires in the middle of the poles tightly. You can use it like the multimeter.

Phase 3: Washing of the Nano-material
Now you can empty the rest of the caustic solution out of the box and put up the lid in a way, that a little air comes all the time into the box. So the Nano-coating can dry slowly. Till the Infinity Loops are dry, it can also take a few days, depending on the caustic leftovers in the box and how much air comes into the box. You can also continue using the multimeter (or battery). When the Infinity Loops are totally dry, they will have white caustic leftovers on it. Even it is only a small veil, or in any case, you have to wash them. Simply pour warm water over the Infinity Loops, pour the whole water out again and repeat the process a few times. Then place the box open in a warm place, where the Infinity Loops can dry quickly.


Using the Infinity Loops
To hang or attach the Infinity Loops somewhere, you can use e.g. a thread and/or adhesive tape. You can place them around your house, in rooms and everywhere you wish to absorb not wanted fields and to be protected.
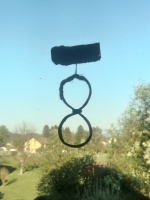
window
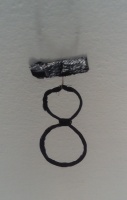
ceiling of the room
computer


Additional Information
Reuse of the caustic solution
The saved caustic solution can be reused for a nano-coating process or other different purposes (e.g. Perfect mixture for garden watering). For making another Nano-coating process, you can just empty it in another nano-coating box with Copper Infinity Loops, coils or plates.