|
|
| (9 intermediate revisions by the same user not shown) |
| Line 1: |
Line 1: |
| − | Required Equipment
| + | == Production of the One Cup One Life - Twin Cup == |
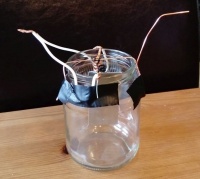
| | + | Another effective possibility to create the One Cup One Life Amino Acids and GANS, are the Twin Cups. They consist of '''two equalized One Cup One Life cups''', which are connected to each other and form an infinity loop of plasmatic field flow. '''(The Twin Cup system is not used for the Second Cup of Life!)''' |
| | | | |
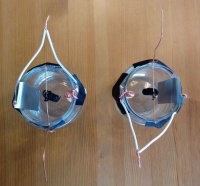
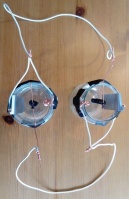
| − | The Infinity Loops are made of stranded copper wire and are nano-coated. | + | Therefore place two One Cup One Life cups next to each other. The second cup is turned 180 degrees. '''The two blank Copper coils of both Cups, have to face each other in the middle.''' |
| | | | |
| − | First the Copper wire is prepared and the Infinity Loops are formed. For this process you need:
| + | The two twisted connecting wires (Zinc plate and bare Copper coil) of the first One Cup One Life, are connected by a '''0.5 - 1 meter long Copper wire''' to the Copper bridge (with the Nano-coated Copper coil) of the second One Cup One Life. The same is repeated from the second One Cup One Life to the first One Cup One Life. |
| − | * stranded Copper wire
| |
| − | * cutting pliers, or scissors
| |
| − | * knife
| |
| − | When the Infinity Loops are formed, they become nanocoated. For this process you need:
| |
| − | * A plastic container with lid (not too big)
| |
| − | * Weights for weighing down the lid,
| |
| − | * Ready-wound Copper (Zinc) coil, wires or plates
| |
| − | * ~ 50 grams of pure NaOH powder or beads on 1 Liter destilled water. (Do not use drain cleaners. You can buy it in art shops; it is used to remove paint as alkaline-based stripper, or in chemist's/drugstore)
| |
| − | * ´1 or more Liters of distilled water (according to the quantity of coils and size of the plastic container) (e.g. 3 L water and ~150 grams of NaOH)
| |
| − | * Electric kettle or stove top to boil water
| |
| | | | |
| − | <gallery widths="200" heights="200">
| + | When the two cups are connected to each other, '''place them at a distance of 0.5 to 1 meter from each other. The Zinc plates and coils of both cups form a line.''' |
| − | File:Infinity Loop 1b.jpg|
| |
| − | File:Infinity Loop 1c.jpg|
| |
| − | File:Infinity Loop 1d.jpg|
| |
| − | File:Infinity Loop 1f.jpg|
| |
| − | </gallery>d
| |
| | | | |
| − | === Production of bare Infinity Loops ===
| + | Now add your 15% salt solution in both cups as you would in your single One Cup One Life. Soon the first Amino Acids and GANS will appear. |
| − | | |
| − | | |
| − | ==== Preparation of the Copper stranded wire ====
| |
| − | Stranded wire is characterized by the fact that many small strands together form a wire. (See photo). You can find it in the hardware store, at an electrical store, or in an emergency, at home, in the power cables of your hair dryer, radio, television, coffee machine, etc. To do this, simply '''unplug''' the power cable from the outlet. Cut the entire electrical cord off of the appliance to use the whole cord.
| |
| | | | |
| | <gallery mode="nolines" widths="200" heights="200"> | | <gallery mode="nolines" widths="200" heights="200"> |
| − | File:OneCup OneLife - different cables.jpg| | + | File:One Cup One Life - Twin Cup 2.jpg| |
| − | File:OneCup OneLife - Stranded wire.jpg|
| + | File:One Cup One Life - Twin Cup 1.jpg| |
| − | </gallery>
| + | File:One Cup One Life - Twin Cup 3.jpg| |
| − | | + | File:One Cup One Life - Twin Cup 4.jpg| |
| − | | |
| − | ====Removing the plastic from the wire====
| |
| − | Usually there are two or three wires in a power cable. The plastic outer sheath must first be removed. There are several ways to do this. (If you buy stranded wires separately, this step is not necessary)
| |
| − | | |
| − | | |
| − | =====Variant 1=====
| |
| − | One way to remove the outer sheath is to have the knife in one hand, place the cable on it and press it with your thumb carefully. With the other hand, as well as with the thumb you turn the cable and the knife cuts deeper and deeper into the plastic. Once you have reached the inner wires you can pull the separated plastic part from the inner wires. This is how you proceed step by step until the inner cables are exposed.<gallery mode="nolines" widths="200" heights="200"> | |
| − | File:OneCup OneLife - Cutting and Stripping off the wire 1.jpg|
| |
| − | File:OneCup OneLife - Cutting and Stripping off the wire 2.jpg|
| |
| − | File:OneCup OneLife - Cutting and Stripping off the 3.jpg| | |
| − | File:OneCup OneLife - Cutting and Stripping off the wire 4.jpg|
| |
| − | File:OneCup OneLife - Cutting and Stripping off the wire 5.jpg|
| |
| − | </gallery>
| |
| − | | |
| − | =====Variant 2=====
| |
| − | Another possibility is to place the cable on the table and hold it with one hand. Press the blade at a slight angle and with the other hand simply pull the cable backwards against the cutting direction. This way you take off a part of the plastic and can take the wires out.
| |
| − | | |
| − | Everyone has different approaches. With a little bit of trying you will find what way works best for you.<gallery mode="nolines" widths="200" heights="200">
| |
| − | File:OneCup OneLife - Cutting the plastic around the wires with a knife 1.jpg|
| |
| − | File:OneCup OneLife - Cutting the plastic around the wires with a knife 2.jpg| | |
| − | File:OneCup OneLife - Cutting the plastic around the wires with a knife 3.jpg|
| |
| − | File:OneCup OneLife - Cutting the plastic around the wires with a knife 4.jpg| | |
| − | File:OneCup OneLife - Cutting the plastic around the wires with a knife 5.jpg|
| |
| − | </gallery>
| |
| − | | |
| − | ====Stripping off the plastic around the strands====
| |
| − | Now you have exposed 2 or 3 wires, which are also covered with plastic. For these wires it is best to use variant 2 to remove the plastic. Do the same as above, especially with the stranded wire, it might require some practice. Put the knife with the cutting edge back at a slight angle, with a little pressure on the plastic, and pull the wire with the other hand underneath. If you hold the knife too steep, or press too hard, you might cut into the thin strands. If you hold the knife too loosely you might slide up over the plastic and start again at the same place. Don't worry, a few cut-through strands are no problem. With some practice you will get better quickly. Remove the plastic completely.<gallery mode="nolines" widths="200" heights="200">
| |
| − | File:OneCup OneLife - Stripping of plastic around the strands 1.jpg|
| |
| − | File:OneCup OneLife - Stripping of plastic around the strands 2.jpg|
| |
| − | File:OneCup OneLife - Stripping of plastic around the strands 3.jpg|
| |
| − | File:OneCup OneLife - Stripping of plastic around the strands 4.jpg|
| |
| − | </gallery>
| |
| − | | |
| − | ====Twisting together the individual strands of the wire====
| |
| − | Hold one end of the wire strands in one hand and the other end in the other hand. With your fingers twist the strands together starting on one end and continue to twist all the way to the other end. Make sure you are twisting the strands firmly together and have secured any fine strands that were cut short into the group.<gallery mode="nolines" widths="200" heights="200">
| |
| − | File:OneCup OneLife - Twisting the strands together 1.jpg|
| |
| − | File:OneCup OneLife - Twisting the strands together 2.jpg|
| |
| − | File:OneCup OneLife - Twisting the strands together 3.jpg|
| |
| − | File:OneCup OneLife - Twisting the strands together 4.jpg|
| |
| − | File:OneCup OneLife - Twisting the strands together 5.jpg|
| |
| − | </gallery>
| |
| − | | |
| − | <gallery widths="200" heights="200">
| |
| − | File:Infinity Loop 1.jpg|
| |
| − | File:Infinity Loop 2.jpg|
| |
| − | File:Infinity Loop 3.jpg|
| |
| − | File:Infinity Loop 4.jpg|
| |
| − | </gallery>d
| |
| − | | |
| − | <gallery widths="200" heights="200">
| |
| − | File:Infinity Loop 5.jpg|
| |
| − | File:Infinity Loop 6.jpg|
| |
| − | File:Infinity Loop 8.jpg|
| |
| − | File:Infinity Loop 9.jpg|
| |
| − | </gallery>d
| |
| − | | |
| − | d<gallery widths="200" heights="200">
| |
| − | File:Infinity Loop 10.jpg|
| |
| − | File:Infinity Loop 11.jpg|
| |
| − | File:Infinity Loop 12.jpg|
| |
| − | </gallery>d
| |
| − | | |
| − | <gallery widths="200" heights="200">
| |
| − | File:Infinity Loop 13.jpg|
| |
| − | File:Infinity Loop 14.jpg|
| |
| − | File:Infinity Loop 15.jpg|
| |
| − | </gallery>d
| |
| − | | |
| − | <gallery widths="200" heights="200">
| |
| − | File:Infinity Loop 16.jpg|
| |
| − | File:Infinity Loop 17.jpg|
| |
| − | File:Infinity Loop 20.jpg|
| |
| − | </gallery>d
| |
| − | | |
| − | <gallery widths="200" heights="200">
| |
| − | File:Infinity Loop 21.jpg|
| |
| − | File:Infinity Loop 23.jpg|
| |
| − | File:Infinity Loop 24.jpg|
| |
| − | File:Infinity Loop 25.jpg|
| |
| − | </gallery>d
| |
| − | | |
| − | <gallery widths="200" heights="200">
| |
| − | File:Infinity Loop 27.jpg|
| |
| − | File:Infinity Loop 29.jpg|
| |
| − | File:Infinity Loop 30.jpg|
| |
| − | File:Infinity Loop 32.jpg|
| |
| − | </gallery>d
| |
| − | | |
| − | <gallery widths="200" heights="200">
| |
| − | File:Infinity Loop 40a.jpg|
| |
| − | File:Infinity Loop 33.jpg|
| |
| − | File:Infinity Loop 34.jpg|
| |
| − | </gallery>d
| |
| − | | |
| − | <gallery widths="200" heights="200">
| |
| − | File:Infinity Loop 41.jpg|
| |
| − | File:Infinity Loop 43.jpg|
| |
| − | File:Infinity Loop 42.jpg|
| |
| − | </gallery>d
| |
| − | | |
| − | <gallery widths="200" heights="200">
| |
| − | File:Infinity Loop 44.jpg|
| |
| − | File:Infinity Loop 45.jpg|
| |
| − | File:Infinity Loop 46.jpg|
| |
| | </gallery> | | </gallery> |


